Our API allows merchants to process and manage transactions for non-card payment methods (PMs)—that is, alternative or local PMs.
To browse all the non-card PMs we support, see Supported Payment Methods.
For more information on non-card payment methods, see our main article.
Message flow
A typical non-card PM transaction consists of at least two messages, but the full lifecycle of a non-card PM transaction may consist of five or more requests. For the majority of non-card PMs, the customer is redirected to the landing page of the relevant payment method to complete authentication and transaction authorization.
A typical message flow may consist of the following steps, each of which is outlined below:
- Initiate - An initiation API request that is required to begin all non-card PM transactions.
- Redirect to payment method - Following a successful payment-set request, redirects the customer to the provided scheme URL to facilitate authentication and authorization.
- Redirect back to your application - Returns the customer to a URL in your application, along with the pending or final status of the transaction.
- Payment status update - Communicates the final status of the transaction. The timing of this notification depends on the payment method.
Initiate
This is a mandatory request used to initiate a non-card PM transaction. It’s used to advise the payment method of the details of a new transaction and to retrieve the necessary information required to facilitate authentication.
The request must contain the following URLs, which need to be set up in your application or website:
- Return URL - The endpoint to which the customer should be redirected after a payment was attempted or successfully completed on the payment method's site.
- Status URL - The endpoint that receives payment-status messages. This includes the result of the transaction or any updates to the transaction status. For certain asynchronous PMs, these notifications may come hours or days after the initial authorization.
The other standard integration elements for non-card PMs are:
- Payment Method
- Descriptor
- Country Code
- Account Holder Name
All elements, if included in the request, must appear in the exact sequence as shown in the provided code samples.
Here, we set up a SOFORT transaction. The response will contain the URL the customer must be redirected to in order to authenticate and authorize the transaction.
<?xml version="1.0" encoding="UTF-8"?>
<request type="payment-set" timestamp="20180613173251">
  <merchantid>MerchantId</merchantid>
  <account>internet</account>
  <amount currency="EUR">1001</amount>
  <autosettle flag="1"/>
  <orderid>N6qsk4kYRZihmPrTXWYS6g</orderid>
  <paymentmethod>sofort</paymentmethod>
  <paymentmethoddetails>
    <returnurl>https://www.example.com/returnUrl</returnurl>
    <statusupdateurl>https://www.example.com/statusUrl</statusupdateurl>
    <descriptor>Test Transaction</descriptor>
    <country>DE</country>
    <accountholdername>James Mason</accountholdername>
  </paymentmethoddetails>
  <comments>
     <comment id="1">comment one</comment>
     <comment id="2">comment two</comment>
  </comments>
 <accountholdername>James Mason</accountholdername>
  <sha1hash>82f3d22c04292f8673bc1e0fb8ecf0c54e38065c</sha1hash>
</request>Redirect to non-card PM
Following a successful Initiate request, the next step is to redirect the customer to the non-card PM for authentication and authorization. This can be achieved, for example, using a simple JavaScript redirect.
Here, we redirect the customer to the value returned in the Redirect URL element of the Initiate response with JavaScript.
The sample code below is a simple example. You’ll need to modify it to suit your particular application or website.
Sample redirect code
<!DOCTYPE html>
<html>
   <head>
      <title>Sample Non-Card PM Redirect</title>
      <meta charset="UTF-8">
   </head>
   <body>
      <script>
         window.location = "https://www.paymentMethod.com/pay";
      </script>
   </body>
</html>
Once the customer completes their transaction with the non-card PM, they are redirected to the URL provided in the Return URL part of the Initiate request. The current status of the transaction is also returned. The transaction variables will be URL-encoded, and the message is limited to 2,048 characters. Once the character limit is reached, no more values are included. That means your application won’t receive any truncated transaction variables.
Depending on the PM used, the message sent to the Return URL might not indicate the final status of the transaction. In the example below, the current result message is PENDING, and the fund status is WAITING. The final transaction status will be sent to the Status URL provided in the Initiate request. In the case of some PMs, this message to the Status URL is sent at almost exactly the same time that the customer is redirected to your Return URL.
In the case of asynchronous payment methods, the Return URL should be treated as an interim step. Your application might put the customer on hold for a few seconds while it checks to see if the Status URL was sent a final update. You can then redirect the customer to a final success or failure page. In the event of the Status URL not receiving the final status update within your determined time limit, you can display a message to the customer informing them that their order will be processed when the final status is received.
Sample return URL parameters
The response will contain a hashed string (sha1hash) made up of key transaction variables, including the Order ID, Result Code, and Timestamp. Your application must construct and check this to ensure the response wasn’t tampered with. For more information, see the Check the Response hash section.
Before you update your application, check that the Order ID and other transaction variables can be definitively linked with the original transaction request and order created in your application.
sha1hash=0aa43f1d647819efd238e46fe3301d80076a8648&
timestamp=20181016103012&
merchantid=Merchant ID&
account=internet&
merchanttransactionid=f48856d1c7e4492eb7594e68e2fc682c&
orderid=N6qsk4kYRZihmPrTXWYS6g&
result=01&
Amount=100&
message=PENDING&
paymentpurpose=37TC6LD Test Transaction&
paymentmethod=sofort&
fundstatus=WAITING&
pasref=14627849160897986&
country=DEStatus update
As we mentioned previously, depending on the payment method being used, the Return URL provided in the payment-set request might not receive the final transaction status.
The Status URL receives the final status. The format of the message is the same as the Return URL. Again, depending on the PM used, this can happen at the same time as the customer is redirected to your Return URL, moments after—or, potentially, the final status update might come days later. So, the Return URL acts as an interim processing page, waiting for the final update.
For payment methods in which you expect the final status update to come days later, your Status URL will need to accept the message sent by Global Payments, find the correct order in your application, and update the status accordingly. You may want to inform the customer at this point that their payment was finally accepted. You can also initiate the dispatch of items.
In summary, the Status URL needs to be an endpoint in your application capable of accepting an HTTP message. This will inform your application of the final status of a transaction. Upon receipt, you can validate the response, check the details against what your application has stored, and update accordingly.
Sample Status URL parameters
The response message will contain a hashed string (sha1hash) made up of key transaction variables, including the Order ID, Result Code, and Timestamp. Your application must construct and check this to ensure the response wasn’t tampered with. For more information, see the Check the Response hash section.
Before you update your application, check that the Order ID and other transaction variables can be definitively linked with the original transaction request and order created in your application.
sha1hash=0aa43f1d647819efd238e46fe3301d80076a8648&
timestamp=20181016103012&
merchantid=Merchant ID&
account=internet&
merchanttransactionid=f48856d1c7e4492eb7594e68e2fc682c&
orderid=N6qsk4kYRZihmPrTXWYS6g&
result=01&
Amount=100&
message=PENDING&
paymentpurpose=37TC6LD Test Transaction&
paymentmethod=sofort&
fundstatus=WAITING&
pasref=14627849160897986&
country=DERefund
This request allows you to fully or partially refund a successful transaction. You must use the same Order ID as the original initiate request in addition to the following elements:
- Payments Reference — Must be the one returned in the Initiate response.
- Refund Password — Hashed with the SHA-1 algorithm and included in the Refund element.
<?xml version="1.0" encoding="UTF-8"?>
<request type="payment-credit" timestamp="20160103174525">
  <merchantid>MerchantId</merchantid>
  <account>internet</account>
  <amount currency="EUR">1999</amount>
  <orderid>wZLVqHNnbZKBJhbeiW</orderid>
  <pasref>95427846660897986</pasref>
  <paymentmethod>sofort</paymentmethod>
  <paymentmethoddetails>
    <returnurl>https://www.example.com/returnUrl</returnurl>
    <statusupdateurl>https://www.example.com/statusUrl</statusupdateurl>
    <country>DE</country>
  </paymentmethoddetails>
  <comments>
     <comment id="1">comment one</comment>
     <comment id="2">comment two</comment>
  </comments>
  <refundhash>8347589234572387502457230459827345</refundhash>
</request>Test Pay
To test your integration, we provide a simple simulator application to test redirecting the customer to a particular payment method along with your Return and Status Update URLs. By setting the payment method as testpay in the Initiate request, your application can then redirect the customer to the simulator.
<?xml version="1.0" encoding="UTF-8"?>
<request type="payment-set" timestamp="20180613173251">
  <merchantid>MerchantId</merchantid>
  <account>internet</account>
  <amount currency="EUR">1001</amount>
  <autosettle flag="1"/>
  <orderid>N6qsk4kYRZihmPrTXWYS6g</orderid>
  <paymentmethod>testpay</paymentmethod>
  <paymentmethoddetails>
    <returnurl>https://www.example.com/returnUrl</returnurl>
    <statusupdateurl>https://www.example.com/statusUrl</statusupdateurl>
    <descriptor>Test Transaction</descriptor>
    <country>DE</country>
    <accountholdername>James Mason</accountholdername>
  </paymentmethoddetails>
  <sha1hash>82f3d22c04292f8673bc1e0fb8ecf0c54e38065c</sha1hash>
</request>Simulator page
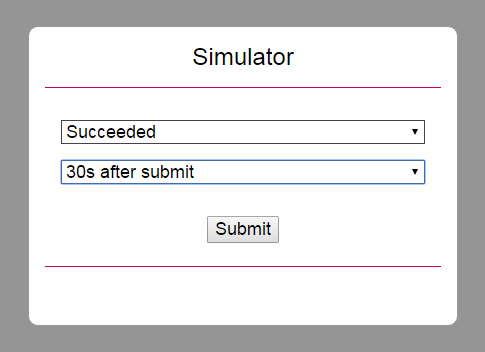
The Simulator page provides a range of messages to send to the Return and Status URLs. The delay selection determines when the Status URL receives the final status update. You can test PMs in which the final status is sent moments, hours, or even days after the transaction is completed by the customer.
The final status might also be sent at the same time as the redirection and message to the Return URL (No Delay). The responses returned by the simulator will be the same format of those outlined in the other steps in this guide.
The response and delay selections are outlined below.
| Response Selection | Delay Selection |
|---|---|
| Succeeded | No delay |
| Pending | 30s after submit |
| Failed UserAbort | 1m after submit |
| Failed InputData | 5m after submit |
| Failed LocalDecline | 15m after submit |
| Failed RemoteDecline | 1h after submit |
| Failed Timeout | |
| Failed LocalError | |
| Failed RemoteError | |
| Failed Unknown |
GET /payments endpoint
The GET /payments endpoint can also be used for querying payment reports based on the parameters below. The required fields are merchantTransactionID and/or startDateTime and endDateTime; if absent, a BAD-REQUEST response (400) is returned.
Other fields, such as accountId or transactionState are used to add more filters to the result list. If you send merchantTransactionID, you will get back a list of one transaction. You can also pass in other optional fields as search query parameters to fetch a list of transactions meeting that search criteria. As an example, you could pass in startDateTime and endDateTime to fetch a list of transactions within a date range.
GET request syntax
Type indicates whether the element is Mandatory (M), Optional (O), or Conditional (C)—dependent on another field or regional requirement.
| Element/Field | Category | Format | Type | Length | Description |
|---|---|---|---|---|---|
| timestamp | timestamp | numeric | M | 14 | Timestamp of the request. Can only be between yesterday and tomorrow. Format: YYYYMMDDHHMMSS |
| merchantId | string | alphanumeric | M | 1-50 | Client ID assigned by us. |
| accountId | string | alphanumeric | O | 1-50 | The sub-account for the request to be processed through. |
| startDateTime | timestamp | numeric | C | 14 | Used to search between a date range (maximum range is 30 days). Format:YYYYMMDDHHMMSS requires either start-end Date either MerchantTransactionId |
| endDateTime | timestamp | numeric | C | 14 | Used to search between a date range (maximum range is 30 days). Format:YYYYMMDDHHMMSS requires either start-end Date either MerchantTransactionId |
| returnPii | boolean | True or False | O | NA | Indicates if sensitive information such as destination account number, IBAN, account name, or sort code should be sent back in the response (when set to TRUE). They will not be sent back if set to FALSE. |
| Merchant TransactionId |
string | alphanumeric | C | 32 | Unique identifier assigned by us for a transaction. Requires either start-end Date or MerchantTransactionId. |
| transaction State |
enum | enum | O | NA | Enum with the following acceptable values for various transaction statuses: SUCCEEDED PENDING FAILED INITIATED DECLINED AUTHORISED INDOUBT |
| pageSize | string | numeric | O | 1-100 | Used to control the number of records per page. Useful for query parameters that result in a large list of transactions. If not provided, the value defaults to 100. |
| pageNumber | string | numeric | O | 1-1000000 | Indicates the starting page number of the report. Useful for query parameters that result in a large list of transactions. If not provided, the value defaults to 100. |
Response syntax - GET call successfully executed
| Element/Field | Category | Format | Description |
|---|---|---|---|
| pageNumber | string | numeric | Indicates the starting page number of the report. |
| record_count | string | numeric | Indicates the number of records on a page. |
| max_page_size | string | numeric | Indicates the maximum number of records on a page. |
| total_number _of_records |
string | numeric | Indicates the total number of records in the full report. |
| Merchant ID | string | alphanumeric | Your Client ID assigned by us. Allowed characters: [a-zA-Z0-9.] |
| Account | string | alphanumeric | The sub-account for this request to be processed through. Allowed characters: [a-zA-Z0-9.] |
| Order Id | string | alphanumeric | A merchant supplied reference to identify this transaction. Must be unique for each attempt. Allowed characters: [a-zA-Z0-9_-] |
| Result | string | numeric | The result code indicating the outcome of the transaction. 00 - Transaction completed successfully and finalized. 101 - Transaction did not complete successfully. No further status will be communicated. 01 - Transaction outcome is pending. The final status will be sent to the Status Update URL provided. |
| Message | string | alphanumeric | Text of the response from the gateway, Acquirer, Issuer, or payment method. |
| txid | string | alphanumeric | Unique identifier assigned by the third party provider for a transaction. |
| merchant TransactionID |
string | alphanumeric | Unique identifier assigned by us for a transaction. |
| Payments Reference | string | alphanumeric | Unique reference assigned by us for the transaction. Allowed characters: [a-zA-Z0-9␣] |
| Payment Method | string | enum | Specifies the payment method for this transaction. |
| Payment Purpose | string | alphanumeric | Payment descriptor - What the customer will see on the proof of payment. For example, on their bank statement. |
| Wait For Notification | boolean | A value of 1 indicates that the transaction will most likely remain in status PENDING for a number of hours or even days until the Status Update URL is notified of the final outcome. | |
| Fund Status | string | enum | Funds status of the transaction. Possible values: NOT_EXPECTED WAITING RECEIVED MISSING |
| Country | string | ISO 3166-1 alpha-2 | Two-character country code. |
| Account Holder Name |
string | alphanumeric | Name of the account holder. |
| Account Number |
string | alphanumeric | The customer’s account number. Brazil - Must be at least 4 digits. Mexico - 18 digit CLABE. Germany - Digits only, no leading zeros Allowed characters: [a-zA-Z0-9] |
| IBAN | string | alphanumeric | Code that identifies the customer's bank, account number itself, and the country of origin. Allowed characters: [A-Z0-9] |
| Bank Code | string | alphanumeric | Bank code of the customer’s account. Allowed characters: [a-zA-Z0-9] |
| BIC | string | alphanumeric | Customer bank code. Must be a valid BIC. Allowed characters: [a-zA-Z0-9-*?/#␣] |
| Bank Name | string | alphanumeric | Customer bank name. |
Response syntax - payment initiation failed
| Element/Field | Format | Description |
|---|---|---|
| code | numeric | Three-digit error code. |
| message | string | Error code and description of the error. The following error codes can be received: 401 - Merchant is not enabled for APM. 401 - UNAUTHORIZED: Please check your code and the Developers Documentation(hash mismatch error). 400 - <<descriptive message about specific error in the request fields>> (usually mandatory fields are missing or invalid combination of fields) 500 - INTERNAL SERVER ERROR |
Refunds
This endpoint can also be used to retrieve a list of refunds based on search criteria. It accepts search criteria as query parameters. The table below contains request fields that can be used for a search. You must use merchantRefundID or OrderId or the startDateTime and endDateTime for the query.
Request syntax
Type indicates whether the element is Mandatory (M), Optional (O), or Conditional (C) - dependent on another field or regional requirement.
| Element/Field | Category | Format | Type | Length | Description |
|---|---|---|---|---|---|
| timestamp | timestamp | numeric | M | 14 | The timestamp of the request.This could only be between yesterday and tomorrow. Format: YYYYMMDDHHMMSS |
| merchantId | string | alphanumeric | M | 1-50 | Your Client ID assigned by us. |
| accountId | string | alphanumeric | O | 1-50 | The sub-account for this request to be processed through. It can accept comma-separated lists of accounts as well. |
| startDateTime | timestamp | numeric | O | 14 | Used to search between a date range (max. range is 30 days). Format:YYYYMMDDHHMMSS |
| endDateTime | timestamp | numeric | O | 14 | Used to search between a date range (max. range is 30 days). Format:YYYYMMDDHHMMSS |
| orderId | string | alphanumeric | M | 50 | A merchant supplied reference to identify this transaction. Must be unique for each attempt. |
| Merchant TransactionId |
string | alphanumeric | O | 32 | Unique identifier assigned by us for a transaction. Requires either start-end Date or MerchantTransactionId. |
| transaction State |
enum | enum | O | NA | Enum with below acceptable values for various transaction statuses: INITIATION_PENDING INITIATION_COMPLETED INITIATION_REJECTED INITIATION_FAILED INITIATION_PROCESSING |
| pageSize | string | numeric | O | 1-100 | Number of records provided per page. Used where the list of transactions for the query parameters is large. If not provided, default value is 100. |
| pageNumber | string | numeric | O | 1-1000000 | Page number of the records to start at. Used where the list of transactions for the query parameters is large. If not provided, the default value is 100. |
Generate hash
Follow the steps in this section to build the request security hash, concatenate the specified fields and hash them using the SHA-1 algorithm, concatenate the hashed string with your Shared Secret, hash it again, and add the resulted string to the request.
In addition to SHA-1, you can also generate your hash using SHA-256. The resulting hash should be placed in the sha256hash tag instead of the sha1hash tag. For more information, contact our support team at ecomsupport@globalpay.com.
Build the Request hash
Use the drop-down arrow below to select a request type: Initiate or Refund. After making a selection, the steps on how to build the request hash for that type are provided.
Check hash
Follow the steps in this section to build the response security hash, concatenate the specified fields and hash them using the SHA-1 algorithm, concatenate the hashed string with your Shared Secret, hash it again, and add the resulted string to the request.
Check the Response hash
Use the drop-down arrow below to select a request type: Initiate, Redirect to APM, Status Update, or Refund. After making a selection, the steps on how to check the response hash for that type are provided.
Postman collection
Our Postman collection for non-card payment methods is available for downloading. You can use this collection to test transactions for all of our alternative and local supported payment methods via the Ecommerce XML API.
The zip file below contains the following files:
- LPM Postman Collection — A JSON file that contains Hosted Payment Page (HPP), XML, and JSON calls
- LPM Environment — A JSON file for use with the HPP and JSON calls
To download the collection (.zip file), click the button below: