By integrating with our Adobe Commerce plugin, you'll gain access to the full range of our solutions, including PCI DSS scope reduction via Hosted Fields (Drop-In UI), credit and debit processing, Digital Wallets, Card Storage, 3D Secure, Order Management, and Fraud Management.
Specifications
- Categories: Extensions, Payments & Security, Payment Integration
- Platform compatibility: Open Source (CE): 2.4 (current), 2.3 (obsolete); Commerce on prem (EE): 2.4 (current), 2.3 (obsolete); Commerce on Cloud (ECE): 2.4 (current), 2.3 (obsolete)
Step 1: Installation
Access plugin
Click the button below to download this plugin and view any related documentation available.
Credentials
Sandbox credentials
Our Adobe Commerce plugin requires credentials to our Unified Payments gateway. Test credentials can be obtained after registering with our developer portal. Once registration is complete, the required App Key and App Id can be found under the Unified Payments Apps section of the Profile menu. For more information and instructions, see our Unified Payments Apps article.
Apple Pay credentials
To integrate with Apple Pay, you’ll need to obtain the encrypted payment credentials. To do this, follow the steps in the applicable Apple guide below:
For more Apple Pay setup information, see our Apple Pay article.
Configuration
To configure this plugin, follow these steps.
- Log in to the Admin panel for Adobe Commerce.
- Navigate to Stores > Configuration.
- Under the Sales heading, select the Payment Methods option.
- From here, you can configure the Unified Payments gateway as well as the payment methods supported by Adobe Commerce.
Settings
The Unified Payments gateway offers payment through credit and debit cards. Additional payment methods like Digital Wallets (Google Pay, Apple Pay, and PayPal), Buy Now Pay Later (Affirm, Clearpay, and Klarna), and Bank Payment (Open Banking) can be enabled via the Unified Payments gateway.
Unified Payments settings
The Unified Payments Settings tab allows you to enter your overall account credentials. These global settings apply to all integration types. You can enter specific credentials for different websites by changing the website scope in Adobe Commerce.
The following table describes the fields that appear on the Unified Payments Settings tab for Adobe Commerce.
| Field | Description |
|---|---|
| Enabled | Determines if the payment method is available at your Adobe Commerce store’s checkout. |
| Title | Description of the payment method displayed to the customer at checkout, e.g., “Credit Card.” The title will also be recorded in Adobe Commerce to indicate how the transaction was processed. |
| Sandbox Mode | Allows you to switch between the Production (Live) and Sandbox version of your account with us. |
| Sandbox App Id | The App Id and App Key are used to obtain a bearer access token to execute API actions. For more information, see the Sandbox credentials section. |
| Sandbox App Key | |
| Credentials Check | Validates your credentials. Note: Payment methods will not display at checkout if the credentials are incorrect. |
| Contact Url | A link to an About or Contact page on your website with customer care information (max length: 50). |
| Payment Action | The Sale transaction can be flagged for automatic capture (Charge) or flagged as requiring a separate capture action later (Authorize). |
| Allow Card Saving | Determines whether a customer's card can be saved to our Card Storage solution following a successful transaction. If set to Yes, a checkbox displays on the Hosted Fields form that gives the customer the choice to store their card. If set to No, no checkbox displays, and the card is not stored. |
| Debug | Allows logging of all requests to and from the gateway. Can also log private data. Should only be enabled in a development or stage environment. Logs can be found at var/log/. |
| Order Transaction Descriptor | During a Capture or Authorize payment action, this value is passed along as the transaction-specific descriptor listed on the customer's bank account (max length: 25). |
| Fraud Mode | Enables merchants to automatically Pass, Hold, or Block transactions based on the result of the rules configured via the Fraud Management section in Ecommerce Portal. |
| Enable 3D Secure | Enables the 3D Secure feature. For more details, see the 3D Secure section. |
Google Pay settings
For this payment method to work, you’ll need to fully configure the Unified Payments gateway. For more information, see the Unified Payments settings section.
The Google Pay Settings tab allows you to enter your overall account credentials. These global settings apply to all integration types. You can enter specific credentials for different websites by changing the website scope in Adobe Commerce.
The following table describes the fields that appear on the Google Pay Settings tab for Adobe Commerce.
| Field | Description |
|---|---|
| Enabled | Determines if the payment method is available at your Adobe Commerce store’s checkout. |
| Title | Description of the payment method displayed to the customer at checkout, e.g., "Pay with Google Pay." The title is also recorded in Adobe Commerce to indicate how the transaction was processed. |
| Payment Action | The Sale transaction can be flagged for automatic capture (Charge) or flagged as requiring a separate capture action later (Authorize). |
| Client ID | The Client ID provided by us. |
| Google Merchant ID | The Merchant ID provided by Google. |
| Google Merchant Display Name | The text displayed to the customer in the Google Pay dialog box. |
| Accepted Cards | Determines what card types can be used at checkout when paying with Google Pay. |
| Allowed Card Authentication Methods | Methods allowed to authenticate a card transaction. Allowed values: PAN_ONLY: This authentication method is associated with payment cards stored on file with the user's Google Account. CRYPTOGRAM_3DS: This authentication method is associated with cards stored as Android device tokens. PAN_ONLY can expose the Funding Primary Account Number (FPAN), which requires an additional Strong Customer Authentication (SCA) step up to a 3DS check. Currently, we don't support the Google Pay SCA challenge with an FPAN. For the best acceptance, we recommend that you provide only the CRYPTOGRAM_3DS option. |
| Button Color | Determines the color of the Google button displayed at checkout. |
Apple Pay settings
For this payment method to work, you’ll need to fully configure the Unified Payments gateway. For more information, see the Unified Payments settings section.
The Apple Pay Settings tab allows you to enter your overall account credentials. These global settings apply to all integration types. You can enter specific credentials for different websites by changing the website scope in Adobe Commerce.
The following table describes the fields that appear on the Apple Pay Settings tab for Adobe Commerce.
| Field | Description |
|---|---|
| Enabled | Determines if the payment method is available at your Adobe Commerce store’s checkout. |
| Title | Description of the payment method displayed to the customer at checkout, e.g., "Pay with Apple Pay." The title is also recorded in Adobe Commerce to indicate how the transaction was processed. |
| Payment Action | The Sale transaction can be flagged for automatic capture (Charge) or flagged as requiring a separate capture action later (Authorize). |
| Apple Merchant ID | The Merchant ID provided by Apple. For more info on creating an Apple Merchant ID, see Apple Pay Programming. |
| Apple Merchant Cert Path | The path for the .crt.pem file. This path is the relative path from the root. For example, if you store this certificate as <magento_location>/.well-known/ApplePay.crt.pem, the path should be .well-known/ApplePay.crt.pem For more Apple Pay setup information, see the Apple Pay credentials section or our Apple Pay article. |
| Apple Merchant Key Path | The path for the .key.pem file. For more Apple Pay setup information, see the Apple Pay credentials section or our Apple Pay article. |
| Apple Merchant Key Passphrase | The encryption key for the .key.pem file. If the .key.pem file is not encrypted, this field must be empty. |
| Apple Merchant Domain | To fill this field, you first need to register and validate your domain in your Apple account. Follow the steps in the Apple Developer Account Help (see the “Register a merchant domain” and “Verify a merchant domain” sections). Once validated, the value that must be inserted in this field is the Domain value you have in your Apple account for the current domain. |
| Apple Merchant Display Name | The text displayed to the customer in the Apple Pay dialog box. |
| Accepted Cards | Determines what types of cards can be used at checkout when paying with Apple Pay. |
| Button Color | Determines the color of the Apple Pay button displayed at checkout. |
PayPal settings
For this payment method to work, you’ll need to fully configure the Unified Payments gateway. For more information, see the Unified Payments settings section.
The PayPal Settings tab allows you to enter your overall account credentials. These are global settings that apply to all integration types. You can enter specific credentials for different websites by changing the website scope in Adobe Commerce.
The following table describes the fields that appear on the Settings tab.
| Field | Description |
|---|---|
| Enabled | Determines if the payment method is available at your Adobe Commerce store’s checkout. |
| Title | Description of the payment method displayed to the customer at checkout, e.g., "Pay with PayPal." The title will also be recorded in Adobe Commerce to indicate how the transaction was processed. |
| Payment Action | The Sale transaction can be flagged for automatic capture (Charge) or flagged as requiring a separate capture action later (Authorize). |
Affirm settings
For this payment method to work, you’ll need to fully configure the Unified Payments gateway. For more information, see the Unified Payments settings section.
The Affirm Settings tab allows you to enter your overall account credentials. These are global settings that apply to all integration types. You can enter specific credentials for different websites by changing the website scope in Adobe Commerce.
The following table describes the fields that appear on the Affirm Settings tab for Adobe Commerce.
| Field | Description |
|---|---|
| Enabled | Determines if the payment method is available at your Adobe Commerce store’s checkout. |
| Title | Description of the payment method displayed to the customer at checkout, e.g., "Pay with Affirm." The title will also be recorded in Adobe Commerce to indicate how the transaction was processed. |
| Payment Action | The Sale transaction can be flagged for automatic capture (Charge) or flagged as requiring a separate capture action later (Authorize). |
Clearpay settings
For this payment method to work, you’ll need to fully configure the Unified Payments gateway. For more information, see the Unified Payments settings section.
The Clearpay Settings tab allows you to enter your overall account credentials. These are global settings that apply to all integration types. You can enter specific credentials for different websites by changing the website scope in Adobe Commerce.
The following table describes the fields that appear on the Clearpay Settings tab for Adobe Commerce.
| Field | Description |
|---|---|
| Enabled | Determines if the payment method is available at your Adobe Commerce store’s checkout. |
| Title | Description of the payment method displayed to the customer at checkout, e.g., "Pay with Clearpay." The title will also be recorded in Adobe Commerce to indicate how the transaction was processed. |
| Payment Action | The Sale transaction can be flagged for automatic capture (Charge) or flagged as requiring a separate capture action later (Authorize). |
Klarna settings
For this payment method to work, you’ll need to fully configure the Unified Payments gateway. For more information, see the Unified Payments settings section.
The Klarna Settings tab allows you to enter your overall account credentials. These are global settings that apply to all integration types. You can enter specific credentials for different websites by changing the website scope in Adobe Commerce.
The following table describes the fields that appear on the Klarna Settings tab for Adobe Commerce.
| Field | Description |
|---|---|
| Enabled | Determines if the payment method is available at your Adobe Commerce store’s checkout. |
| Title | Description of the payment method displayed to the customer at checkout, e.g., "Pay with Klarna." The title will also be recorded in Adobe Commerce to indicate how the transaction was processed. |
| Payment Action | The Sale transaction can be flagged for automatic capture (Charge) or flagged as requiring a separate capture action later (Authorize). |
Bank Payment settings
For this payment method to work, you’ll need to fully configure the Unified Payments gateway. For more information, see the Unified Payments settings section.
The Bank Payment Settings tab allows you to enter your overall account credentials. These are global settings that apply to all integration types. You can enter specific credentials for different websites by changing the website scope in Adobe Commerce.
The following table describes the fields that appear on the Settings tab.
| Field | Description |
|---|---|
| Enabled | Determines if the payment method is available at your Adobe Commerce store’s checkout. |
| Title | Description of the payment method displayed to the customer at checkout, e.g., "Bank Payment." The title will also be recorded in Adobe Commerce to indicate how the transaction was processed. |
| Payment Action | The Sale transaction can be flagged for automatic capture (Charge) or flagged as requiring a separate capture action later (Authorize). Currently, the Authorize mode is not supported. |
| Account Number | Account number for bank transfers within the United Kingdom (UK-to-UK bank). Only required if no bank details are stored on the account. |
| Account Name | The name of the individual or business on the bank account. Only required if no bank details are stored on the account. |
| Sort Code | Six digits that identify the bank and branch of an account. Included with the account number for UK-to-UK bank transfers. Only required if no bank details are stored on the account. |
| IBAN | Key field for bank transfers for Europe-to-Europe transfers. Only required if no bank details are stored on the account. Only required for EUR transacting merchants. |
| Countries | Allows you to input a COUNTRY or string of COUNTRIES to limit what is shown to the customer. Including a country overrides your default account configuration. Format: List of ISO 3166-2 (two characters) codes separated by a | Example: FR|GB|IE |
| Currencies | The payment method is displayed at checkout only for the selected currencies. |
| Sort Order | Checkout sort order. |
Step 2: Test integration
Use the test card numbers below to verify that your integration was set up properly. For testing, you can use any cardholder name, any expiry date in the future, and any CVN security code.
For a full list of test cards, see our Test Cards article.
Step 3: Going live
Now that you’ve successfully installed the plugin and tested to see if it was installed properly, you’re all set to go live in the Production environment. For more information, see our Integration Validation to Go Live article.
Connect your integration for Production:
- Input your Production App Id / App Key into your gateway configuration in the Adobe Commerce Admin panel, and enable the "Live Mode" for the Unified Payments gateway.
Go to Production with Google Pay:
- This payment method shares the Sandbox/Production mode with the Unified Payments gateway.
- Process test transactions:
- Google does not offer test cards, so you’ll have to use real ones.
- In Sandbox mode, our gateway allows only specific order amount values; all other values will be automatically declined. You can check the allowed values in the Google Pay section of our Test Cards article.
Go to Production with Apple Pay:
- This payment method shares the Sandbox/Production mode with the Unified Payments gateway.
- Process test transactions:
- You first need to configure a Sandbox account for Apple. For information on how to create a Sandbox account and test cards, see the Apple’s Sandbox Testing article.
- In Sandbox mode, our gateway allows only specific order amount values; all other values will be automatically declined. You can check the allowed values in the Apple Pay section of our Test Cards article.
Go to Production with PayPal:
- This payment method shares the Sandbox/Production mode with the Unified Payments gateway.
- Process test transactions:
- Contact the Unified Payments team and ask them to enable PayPal for your current account.
- Once you get redirected to the PayPal payment page, create an account and process different transactions.
Go to Production with Affirm:
- This payment method shares the Sandbox/Production mode with the Unified Payments gateway.
- Process test transactions:
- Contact the Unified Payments team and ask them to enable Buy Now Pay Later for your current account (see Integration Support).
- This payment method will be displayed at checkout only for the following currency - country cases: USD - US and CAD - CA.
- Once you get redirected to the Affirm payment page, create an account and process different transactions.
Go to Production with Clearpay:
- This payment method shares the Sandbox/Production mode with the Unified Payments gateway.
- Process test transactions:
- Contact the Unified Payments team and ask them to enable Buy Now Pay Later for your current account (see Integration Support).
- This payment method will be displayed at checkout only for the following currency - country cases: USD - US, CAD - CA, GBP - GB, AUD - AU, and NZD - NZ.
- Once you get redirected to the Clearpay payment page, create an account and process different transactions.
Go to Production with Klarna:
- This payment method shares the Sandbox/Production mode with the Unified Payments gateway.
- Process test transactions:
- Contact the Unified Payments team and ask them to enable Buy Now Pay Later for your current account (see Integration Support).
- This payment method will be displayed at checkout only for the following currency - country cases: USD - US, CAD - CA, GBP - GB, AUD - AU, NZD - NZ, EUR - AT, EUR - BE, EUR - DE, EUR - ES, EUR - FI, EUR - FR, EUR - IT, EUR - NL, CHF - CH, DKK - DK, NOK - NO, PLN - PL, and SEK - SE.
- Once you get redirected to the Klarna payment page, create an account and process different transactions.
Go to Production with Bank Payment:
- This payment method shares the Sandbox/Production mode with the Unified Payments gateway.
- Process test transactions:
- Contact the Unified Payments team and ask them to enable Open Banking for your current account.
- Once you get redirected to the Bank Payment payment page, create an account and process different transactions.
Additional information
This section contains information on payment solutions such as Hosted Fields and Hosted Payment Page, risk management solutions such as 3D Secure and Fraud Management, as well as expanded features such as Card Management and Order Management.
For the Buy Now Pay Later payment methods (Affirm, Clearpay, and Klarna), additional information on checkout flow can be found in the Async Payment Methods section.
Hosted Fields
For information on our PCI DSS requirement-reducing hosted solution, Hosted Fields (Drop-In UI), see our Hosted Fields - Overview page.
Hosted Payment Page
For information on our Hosted Payment Page for Unified Payments REST API integrators, see our Hosted Payment Page - Overview page.
3D Secure
For information on our 3D Secure solutions, see our 3D Secure - Overview page. We provide a Simulator Issuer Access Control Server that allows you to test different 3D Secure scenarios. For more information, see the 3D Secure section of our Test Cards article.
Card Management
All card data is tokenized using our tokenization service.
Registered customers can save their card information by selecting the “Save for later use” checkbox in the checkout form. The Adobe Commerce plugin securely stores card data with us and receives a token representation of the card, which is stored in the Adobe Commerce vault, with no increased PCI compliance requirements.
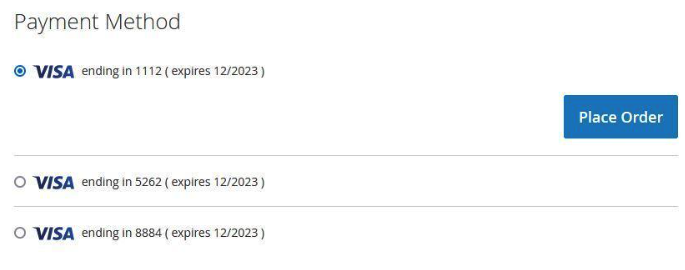
- The customer can choose from the list of their stored cards.
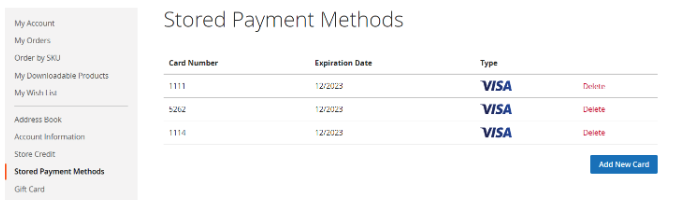
- Registered customers can see their stored cards under My Account > Stored Payment Methods. They can also add new cards or delete the existing ones from here.
Async Payment Methods
This section applies to the following payment methods: Buy Now Pay Later (Affirm, Clearpay, and Klarna), Bank Payment, and PayPal (except the “Receiving the final payment status” section).
Because these payment methods are handled by third-party services and require further processing from these third parties, the checkout flow has some differences compared with the Unified Payments or Digital Wallets ones.
Initiate the payment
- When a customer clicks the Place Order button, the order is placed with a Pending Payment status.
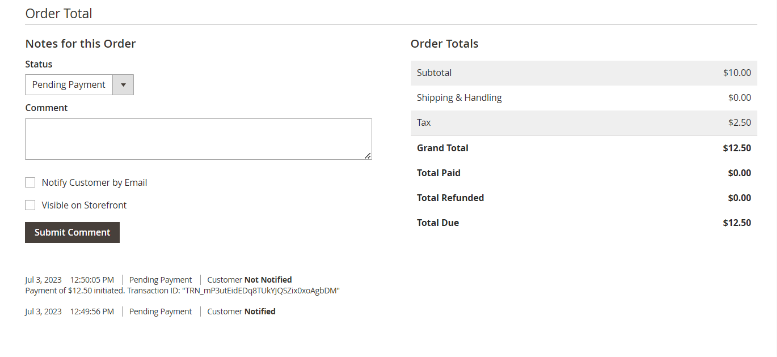
- Once the order has been created, an Initial Payment request type will occur.
Redirect to third-party service
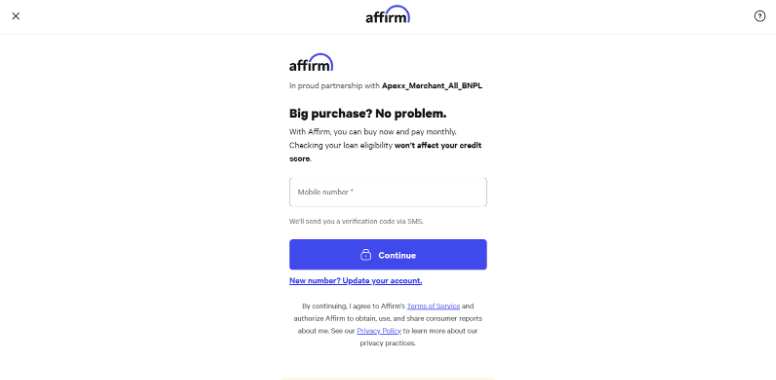
If the Initiate Payment request is successful, the customer will be redirected to the third-party service to pay.
Redirect back to your website
Cancel the payment
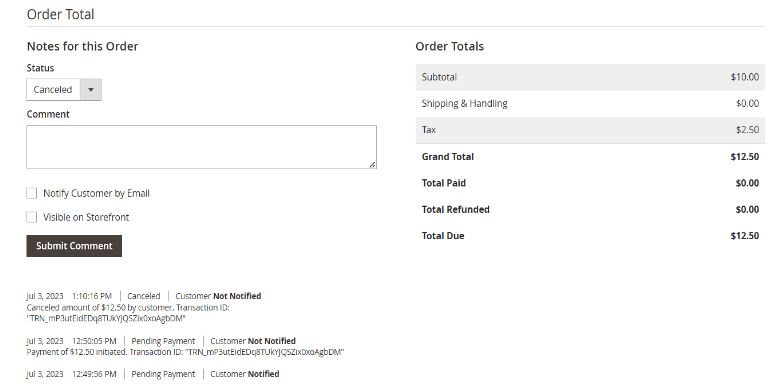
- If the customer decides to cancel the payment using the option provided by the third-party service (for example, clicking the X button on top left of the screen), they will be redirected to the cart page. Also, the order that was previously created will be canceled.

- The order canceling will not be processed on your website if the customer decides to leave the page using another option (for example, browser back button, browser X button, closing the tab, and so forth). Therefore, the order will still have the Pending Payment status in these cases.
Successfully completing the payment
- If the customer successfully completes the payment, they will be redirected to the success page.
- At this point, the order will still have a Pending Payment status. For more details, see the next section.
Receiving the final payment status
If you’re using Apache, you need a version greater than 2.4.47 and the following directive added to your config: SetEnv proxy-sendcl 1. Otherwise, the orders within your platform will not be updated as expected.
- Because these payment methods are asynchronous, the final transaction status might not be available immediately.
- Once our system gets the final status, it will notify your website.
- At that point, the order status will change to Processing.
Pending Payment orders
- In cases where the orders are stuck in a Pending Payment status, we provide a Get Transaction Details button.

- Clicking the Get Transaction Details button fetches all the information about the current transaction and displays it in a pop-up window.
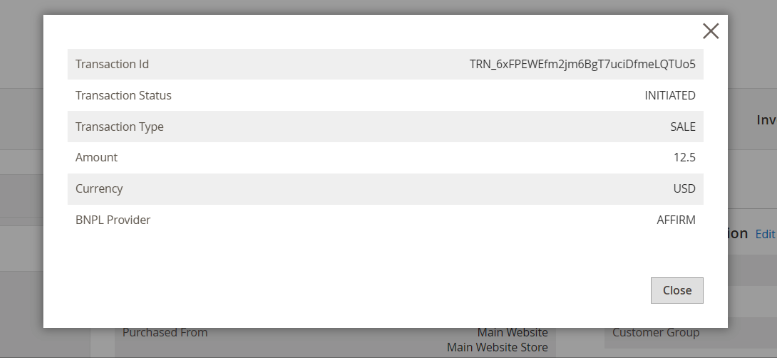
- Based on the Transaction Status, you can manually cancel the order or just continue with the normal flow.
Order Management
- Detailed information on transaction outcome is available in the Orders section for Adobe Commerce.
- If the payment was successful, the order status will be set to the New Order Status configured under the relevant configuration section for us.
Create an invoice – capture a transaction
Merchants who use Authorize at checkout will authorize the funds on the customer’s card, but the transaction won’t be placed in the settlement file until we capture it. The amount of time the funds can remain ring-fenced on the customer's card may vary between different Issuers and Acquirers. Card brands like Visa and Mastercard have their own rules regarding how long transactions can wait to be captured.
- To view the response returned by us, first open the order and then select the Transactions tab. Select the relevant transaction to view the details of our response.
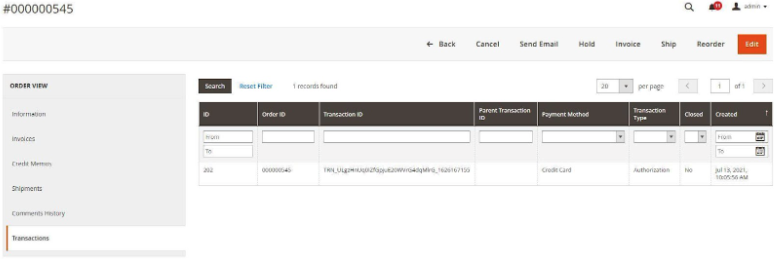
- If successfully authorized, the funds will be ring-fenced on the customer’s account. When you want to include the transaction in the next settlement file (also known as a batch), you can simply send a Capture (Settle) request. When the transaction is captured with the Acquirer, the funds are deducted from the customer's account and settled into the merchant's account.
- At this point, if you select Invoices from the left menu, you'll see that there is no invoice associated with the order. This is because we haven't captured it yet.
- Click Submit Invoice to create a new invoice to be raised against this order. Here, you can review the result of the transaction before deciding to capture the funds.
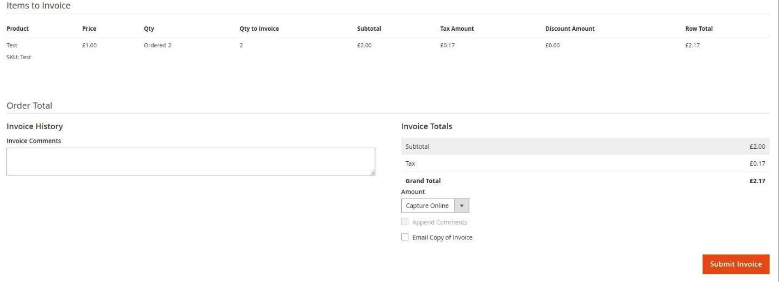
- You must select Capture Online for the request to be sent to us. Once you click Submit Invoice, a Capture request with the amount specified is sent.
- Once complete, the result of the Settle request is displayed. A comment indicating the amount captured is included in the order. For example: Captured amount of £2.17 online. Transaction ID: “TRN_ULgzHnUq0IZfGpjuE20WVrG4dqMlrG_1626167155”
- If you select Invoices from the left menu now, you’ll see the invoice associated with the order.
Create a Credit Memo – refund a captured transaction
Once an order is successfully settled with your Acquirer, you can rebate the customer for 0% to 115% of the original order value. To do this, you must create a Credit Memo in Adobe Commerce.
Important Note: The Credit Memo must be linked to a specific invoice, not the overall order.
- Navigate to Sales > Orders, and select the order you want to rebate.
- Open the relevant invoice, and click Credit Memo.
- Under Payment Information, you can review the history of the order before deciding to process the rebate.
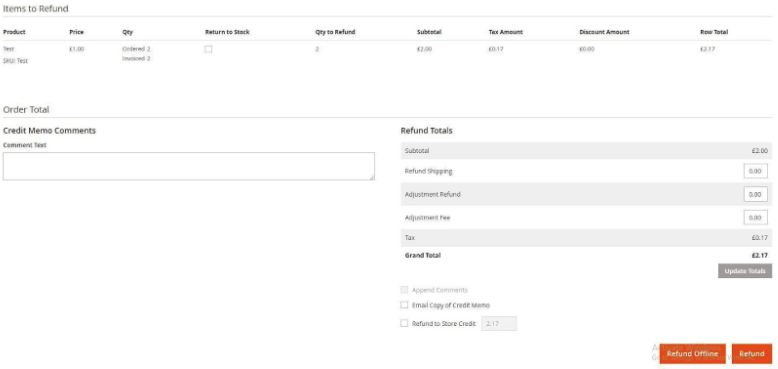
- You must select Refund as opposed to Refund Offline. This will send the rebate request to us. You can edit the amount to rebate by editing the adjustment fields provided by Adobe Commerce.
- Once complete, you will be returned to the Order View tab. A message indicating the outcome of the rebate request is included. A comment indicating the amount captured is included in the order. For example: We refunded £2.17 online. Transaction ID: "TRN_YSaaHfsEfOFp9UB0tlHIUkBkqzaIIJ_1626167155"
Cancel an order - void (reverse) a transaction
You can cancel a transaction before it is sent for funding. The transaction will be fully reversed. If you already captured (settled) the transaction, see the Create a Credit Memo – refund a captured transaction section.
- Navigate to Sales > Orders, and select the order you want to void (reverse).

- Click OK to confirm the pop-up message. This will send the Void (Reverse) request to us.
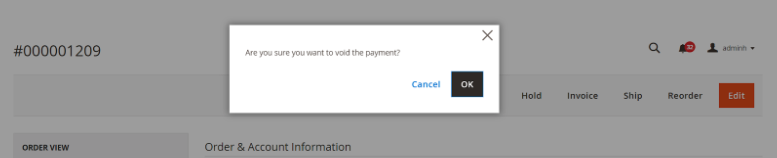
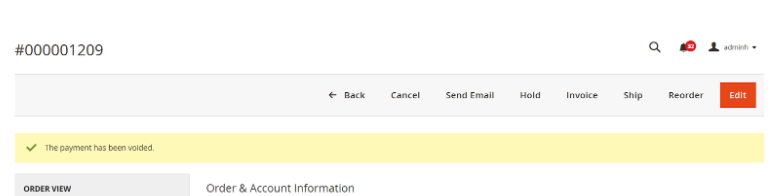
- Once complete, a message will display indicating the outcome of the Void (Reverse) request.
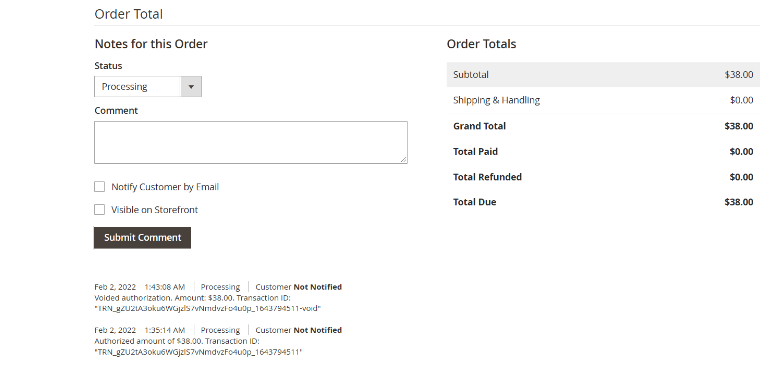
- A comment indicating the voided (reversed) amount is included with the order. For example: Voided authorization. Amount: $38.00. Transaction ID: "TRN_gZU2tA3oku6WGjzlS7vNmdvzFo4u0p_1643794511-void"
Fraud Management
Our Fraud Filter enables merchants to automatically Pass, Hold, or Block transactions based on the result of one or more rule results. This functionality is configured via the Fraud Management section in Ecommerce Portal.
It is important to note that any changes made to the Fraud Filter in Ecommerce Portal will impact the result returned in the API response. You will need to ensure that any changes don't adversely affect transaction processing in your application. For example:
- If the Fraud Filter is turned off in the Ecommerce Portal, the data will not be returned in the transaction response. If the mode is changed between Active and Passive, this change will be reflected in the transaction response.
- If a new rule is added, an additional element will be returned in the response. Similarly if a rule is deleted, the result will be removed from the response.
- If a rule name is edited, the name will change to the new value in the response; the rule ID will remain the same.
Fraud Mode set to Active
- When the Fraud Response is set to Active, the action detailed in the Fraud Filter overall result will be executed.
- All the fraud details related to that transaction will be displayed in the Order Details page, under the Fraud Filter Result tab.
Fraud response is PASS
In this case, the transaction will pass, and it will follow the normal flow in Adobe Commerce.
Fraud response is NOT_EXECUTED
In this case, the transaction will pass, and it will follow the normal flow in Adobe Commerce.
Fraud response is HOLD
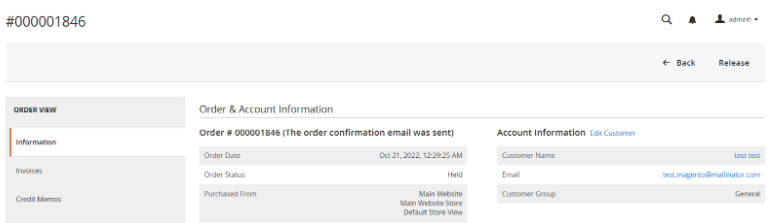
- In this case, the transaction will be held and no further actions will be possible until it is released.
- In Adobe Commerce, the status for the transaction will be set to Held, and Transaction Management will not be available.
- The merchant will have only the option to Release or Cancel (only when the Payment Action is set to Authorize) that order.
- Once released, Transaction Management will be available.
Fraud Response is BLOCK
- In this case, the transaction will be blocked.
- In Adobe Commerce, the customer will receive an error saying that “Your card has been declined by the bank” and no order will be created.
Fraud Mode set to Passive
- When the Fraud Mode is set to Passive, all the rules will be executed, but the action in the Fraud Filter overall will not be executed.
- All the fraud details related to that transaction will be displayed in the Order Details page, under the Fraud Filter Result tab.
Fraud Response is PASS
In this case, the transaction will follow the normal flow in Adobe Commerce.
Fraud Response is NOT_EXECUTED
In this case, the transaction will follow the normal flow in Adobe Commerce.
Fraud Response is HOLD
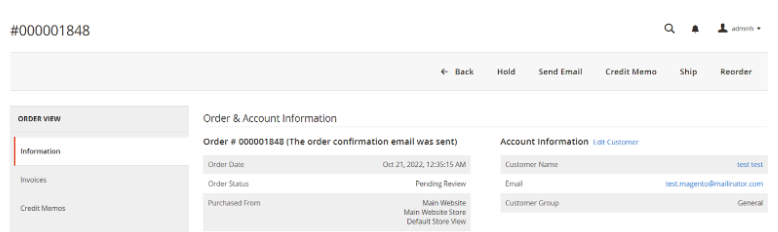
- In this case, the status for the order will be set to Pending Review, and Transaction Management will be available.
- The merchant will have the option to Hold that order.
- If the order is held, Transaction Management will be disabled until the order is released.
Fraud Response is BLOCK
- In this case, the status for the order will be set to Pending Review, and Transaction Management will be available.
- The merchant will have the option to Hold that order. If the order is held, Transaction Management will be disabled until the order is released.
Fraud Mode set to Off
When Fraud Mode is set to Off, the rules will not be executed.
Holding an order
- The merchant will be presented with the option to Hold an order only when the status of the order is Pending Review.
- Once Hold is clicked, a pop-up confirmation message appears.
- If the merchant clicks OK, the Hold request will be executed.
- If the request is successful, the order status is changed to Held, a success message appears, and Transaction Management will not be available.
Releasing an order
- The merchant will be presented with the option to Release an order only when the status of the order is Held.
- Once Release is clicked, a pop-up confirmation message appears.
- If the merchant clicks OK, the Release request will be executed.
- If the request is successful, the order status is changed to Processing, a success message appears, and Transaction Management will be available.