Google Pay enables customers to use the cards they have stored with Google to make quick, easy purchases on merchant websites or in-app. Customers can use the details they store on other Google applications such as Play Store, YouTube, and Chrome web browser.
For more control over which stored cards are used, see our Decrypted Digital Wallets article.
Although we support Google Pay, not all Acquirers do. For more information or to activate Google Pay on your account, contact our support team.
This guide focuses on integrating Google Pay with our Drop-In User Interface (UI), which is a ready-made payment form using our Hosted Fields solution. You’ll learn how to add Google Pay to your payment form using our JavaScript Library and then charge it within your app or as a standalone payment method.
To learn how to use the Hosted Fields components on their own with your existing payment form, see our Hosted Fields - Step By Step Guide.
Step 1: Create an access token
Our API endpoints:
- Sandbox: https://apis.sandbox.globalpay.com
- Production: https://apis.globalpay.com
Before testing or implementing Google Pay via the Drop-In UI, you first need to create an access token, which is required to execute any API requests. The token contains the actions that are permitted for your app.
For added security and integrity, we recommend that you create one access token for each user session, and set the "time to expire" to 10 minutes.
GpApiConfig config = new GpApiConfig();
config.setAppId("AppId");
config.setAppKey("AppKey");
config.setChannel(Channel.CardNotPresent.getValue());
config.setPermissions(new String[] { "PMT_POST_Create_Single" });
config.setIntervalToExpire(IntervalToExpire.TEN_MINUTES);

AccessTokenInfo info = GpApiService.generateTransactionKey(config);
config.setAccessTokenInfo(info);
ServicesContainer.configureService(config);<?php
/**
* This sample code is not specific to the Global Payments SDK and is intended as a simple example and
* should not be treated as Production-ready code. You'll need to add your own message parsing and
* security in line with your application or website
*/
$config = new GpApiConfig();
$config->appId = "APP_ID";
$config->appKey = "APP_KEY";
$config->channel = Channel::CardNotPresent;
$config->permissions = ["PMT_POST_Create_Single"];
$config->intervalToExpire = IntervalToExpire::TEN_MINUTES;
$accessTokenInfo = GpApiService::generateTransactionKey($config);
$accessToken = $accessTokenInfo->accessToken; GpApiConfig config = new GpApiConfig();
config.AppId = "AppId";
config.AppKey = "AppKey";
config.Channel = Channel.CardNotPresent;
config.Permissions = new string[] { "PMT_POST_Create_Single" };
config.IntervalToExpire = IntervalToExpire.TEN_MINUTES;
var info = GpApiService.GenerateTransactionKey(config);
config.AccessTokenInfo = info;
ServicesContainer.ConfigureService(config);curl --location --request POST 'https://apis.sandbox.globalpay.com/ucp/accesstoken' \
--header 'X-GP-Version: 2021-03-22' \
--header 'Accept: application/json' \
--header 'Accept-Encoding: gzip' \
--header 'Content-Type: application/json' \
--data-raw '{
"app_id": "appId",
"nonce": "2022-04-21T15:12:44.390Z",
"secret": "999585dc140865524c4d95f3fa0ce0eb5e2b565b95c67dd43425c4e16d0671cafe89e6e730992911cdf047c7f2f6ac8cc6486311a73dfcc81c763ccb24d0ed4c",
"grant_type": "client_credentials".
"permissions": [
"PMT_POST_Create_Single"
],
"interval_to_expire": "10_MINUTES"
}'SCA and 3DS compliance
Google Pay on the web may expose the Funding PAN (FPAN), depending on the parameters passed from the Google Pay API. Google provides two options through the allowedAuthMethods object:
PAN_ONLY: This authentication method is associated with payment cards stored on file with the user's Google account. Returned payment data includes the FPAN with the expiration month and year.CRYPTOGRAM_3DS: This authentication method is associated with cards stored as Android device tokens. Returned payment data includes a 3D Secure (3DS) cryptogram generated on the device.
PAN_ONLY can expose the FPAN, which requires an additional Strong Customer Authentication (SCA) step—up to a 3DS check. Currently, we don’t support the Google Pay SCA challenge with an FPAN. For the best acceptance, we recommend that you provide only the CRYPTOGRAM_3DS option.
Step 2: Configure JavaScript
Once you’ve created the access token, you can now configure the JavaScript Library to enable Google Pay in your payment form.
Add a <div> tag to render the Drop-In UI payment form to the customer.
<div id="payment-form"></div>
Next, we configure our JavaScript Library with the transaction details required for Google Pay.
<script src="https://js.globalpay.com/4.1.3/globalpayments.js"></script>
<script>
   // configuring Drop-in UI
   GlobalPayments.configure({
      accessToken: "access-token",
      apiVersion: "2021-03-22",
      env: "sandbox" // or "production"
      apms: {
         currencyCode: "EUR",
         allowedCardNetworks: ["VISA", "MASTERCARD", "AMEX", "DISCOVER"],
         googlePay: {
            currencyCode: "EUR",
            countryCode: "IE",
            merchantName: 'Merchant Name',
            allowedAuthMethods: ["PAN_ONLY"],
            allowedCardNetworks: ["AMEX", "MASTERCARD", "VISA"],
            buttonType: "plain",
            merchantId: "12345678901234567890",
            globalPaymentsClientID: "MerchantId"
         }
      }
   });

// creating an instance of the payment form
   var cardForm = GlobalPayments.creditCard.form('#payment-form', {
      amount: "19.99",
      style: "gp-default",
      apms: ["google-pay"]
   });

   // method to notify that payment form has been initialized
   cardForm.ready(() => {
      console.log("Registration of payment form occurred");
   });

   // appending the Google Pay token to the form as a hidden field and
   // submitting it to the server-side
   cardForm.on("token-success", (resp) => {
      // add payment token to form as a hidden input
      const token = document.createElement("input");
      token.type = "hidden";
      token.name = "google-pay-token";
      token.value = resp.paymentReference;

      // add payment method provider
      const provider = document.createElement("input");
      provider.type = "hidden";
      provider.name = "provider";
      provider.value = resp.details.apmProvider;

      // submit data to the integration's backend for processing
      const form = document.getElementById("payment-form");
      form.appendChild(token);
      form.appendChild(provider);
      form.submit();
   });

   cardForm.on("token-error", (resp) => {
      // TODO: Add your error handling
   });

</script>JavaScript configuration (Google Pay specific parameters)
Type indicates whether the element is Mandatory (M), Optional (O), or Conditional (C)—dependent on another field or regional requirement.
| Name | Format | Type | Description |
|---|---|---|---|
| currencyCode | string | M | Currency of the amount in ISO-4217 (alpha-3) format. |
| countryCode | string | M | The country in ISO-3166-1(alpha-2 code) format. |
| merchantName | string | M | Merchant name that appears on the Google Payment sheet. |
| merchantID | string | M | Merchant ID issued by Google. |
| allowedAuthMethods | string | M | Fields supported to authenticate a card transaction. Allowed values: PAN_ONLY CRYPTOGRAM_3DS |
| allowedCardNetworks | string | M | Indicates the card brands the merchant accepts for Google Pay. |
| buttonType | string | O | Button option type for Google Pay. Allowed values: book: The "Book with Google Pay" payment button. buy: The "Buy with Google Pay" payment button (default). checkout: The "Checkout with Google Pay" payment button. donate: The "Donate with Google Pay" payment button. order: The "Order with Google Pay" payment button. pay: The "Pay with Google Pay" payment button. plain: The Google Pay payment button without the added text. subscribe: The "Subscribe with Google Pay" payment button. |
| buttonColor | string | O | Button color option for Google Pay. Allowed values: black white |
| globalPaymentsClientID | string | M | Your Client ID assigned by us. |
Google Pay added to payment form
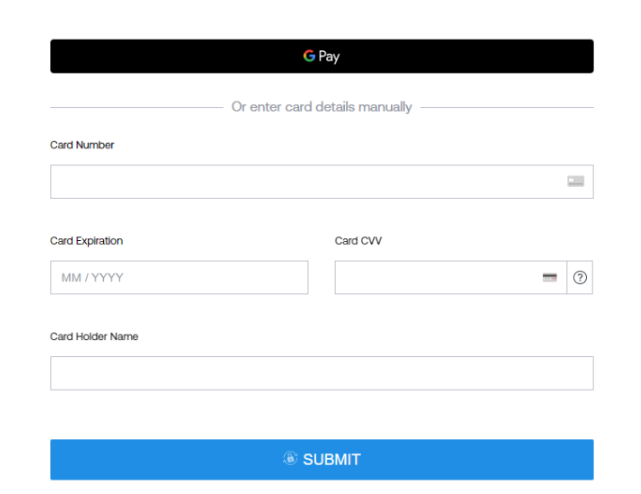
In this example, Google Pay is included as an option above the section to manually enter the card details.
Google Pay additional fields and data
When a successful Google Pay authorization is completed, the Javascript Library exposes the Google Pay token and any additional information that can be used to complete the transaction. The following table describes the fields and data available from Google Pay.
| Name | Description |
|---|---|
| details.apmProvider | The payment method used to execute the transaction. |
| details.billingAddress.addressLine | The address line of the payer’s billing address. |
| details.billingAddress.city | The city of the payer’s billing address. |
| details.billingAddress.country | The country of the payer’s billing address. |
| details.billingAddress.postalCode | The postal code of the payer's billing address. |
| details.billingAddress.phone | The payer’s billing phone number. |
| payerEmail | The payer’s email address. |
| payerPhone | The payer’s phone number. |
| paymentReference | A token that represents, or is the payment method, stored with the digital wallet. |
| shippingAddress.addressLine | The address line of the payer’s shipping address. |
| shippingAddress.city | The city of the payer’s shipping address. |
| shippingAddress.country | The country of the payer’s shipping address. |
| shippingAddress.phone | The postal code of the payer's shipping address. |
| shippingAddress.postalCode | The payer’s shipping address phone number. |
Step 3: Charge the payment method
To charge the payment method from Google Pay, you need to send a Create Transaction request to our Unified Payments REST API. This request is the standard payment request or sale processed by us. Instead of submitting the customer’s card information in the request, you simply pass the unique identifier for the Google Pay payment method.
The transaction now proceeds to authorization as normal and may be successful or declined based on standard criteria such as sufficient funds available and so on.
For more information on creating a Sale transaction with Unified Payments REST API, see the API Explorer for Transactions.
GpApiConfig config = new GpApiConfig();
config.setAppId("AppId");
config.setAppKey("AppKey");
config.setChannel(Channel.CardNotPresent.getValue());

ServicesContainer.configureService(config);

CreditCardData card = new CreditCardData();
card.setCardHolderName("googlepaytoken");
card.setMobileType(MobilePaymentMethodType.GOOGLEPAY);

try {
   Transaction transaction =
           card
                   .charge(new BigDecimal("10"))
                   .withCurrency("EUR")
                   .withModifier(TransactionModifier.EncryptedMobile)
                   .execute();
} catch (GatewayException ex) {
   throw ex;
}$config = new GpApiConfig();
$config->appId = "APP_ID;
$config->appKey = APP_KEY;
$config->channel = Channel::CardNotPresent;
$config->country = "IE";
ServicesContainer::configureService($config);
$card = new CreditCardData();
// this is the Google Pay token received from the JS library at step 2
$card->token = 'googlepaytoken';
$card->mobileType = EncyptedMobileType::GOOGLE_PAY;
$card->cardHolderName = "James Mason";
try {
$transaction = $card->charge(10)
->withCurrency("EUR")
->withModifier(TransactionModifier::ENCRYPTED_MOBILE)
->execute();
} catch (GatewayException $e) {
//@TODO handle exception
}
$responseCode = $transaction->responseCode; // SUCCESS
$transactionStatus = $transaction->responseMessage; //CAPTURED
$transactionId = $transaction->transactionId;var config = new GpApiConfig();
config.AppId = AppId;
config.AppKey = AppKey;
config.Channel = Channel.CardNotPresent;
ServicesContainer.ConfigureService(config);
var card = new CreditCardData();
card.CardHolderName = "googlepaytoken";
card.MobileType = EncyptedMobileType.GOOGLE_PAY;
try
{
var transaction = card.Charge(10m)
.WithCurrency("EUR")
.WithModifier(TransactionModifier.EncryptedMobile)
.Execute();
}
catch (GatewayException ex)
{
throw ex;
}{
"account_name": "Transaction_Processing",
"type": "SALE",
"channel": "CNP",
"capture_mode": "AUTO",
"amount": "1999",
"currency": "EUR",
"reference": "93459c78-f3f9-427c-84df-ca0584bb55bf",
"country": "IE",
"payment_method": {
"name": "James Mason",
"entry_mode": "ECOM",
"digital_wallet": {
"provider": "PAY_BY_GOOGLE",
"payment_token": {"googlepaytoken"}
}
}
}Google Pay standalone
In addition to enabling Google Pay on the payment form, you can also enable Google Pay as a standalone payment method. This allows you to initialize Google Pay at any stage of the checkout journey—for example, adding Google Pay on the product page for a quick checkout.
To set up a standalone instance of Google Pay, we initialize the Alternative Payment Method (APM) form instead of the Card form as shown in the code sample below. Once initialized, Google Pay will render within your specified <div> tag.
<script src="https://js.globalpay.com/4.1.3/globalpayments.js"></script>

   // creating an instance of standalone Google Pay
   var apmForm = GlobalPayments.apm.form('#google-pay', {
      amount: "19.99",
      style: "gp-default",
      apms: ["google-pay"]
});Testing Google Pay
You can test Google Pay in our Sandbox environment. The amount specified in the request will map the tokenized data in the transaction to one of our test cards. For example, an amount of 10.00 will map to the successful Visa test card. For further details, see the Google Pay section in our Test Cards article.
Brand guidelines
For branding guidelines and to download assets, see the Brand Guidelines on the Google Pay website.
For the detailed API specification and a full list of features, see the API Explorer.
This guide focuses on integrating Google Pay directly using our Unified Payments REST API. You'll learn how to obtain the Google Pay token, including complying with 3D Secure authentication standards, as well as how to process an authorization.
Although we support Google Pay, not all Acquirers do. For more information or to activate Google Pay on your account, contact our support team.
Obtain the Google Pay token
To offer Google Pay from your website or in-app, refer to the Google Pay API website for the integration steps. To integrate with our platform, specific parameters must be passed in the PaymentData request to Google.
When you submit a PaymentData request to the Google API, be sure to include the following parameters:
'gateway': 'globalpayments''gatewayMerchantId': '<your merchant id>'
SCA and 3DS compliance
Google Pay on the web may expose the Funding PAN (FPAN) depending on the parameters passed from the Google Pay API. Google provides two options through the allowedAuthMethods object:
PAN_ONLY: This authentication method is associated with payment cards stored on file with the user's Google account. Returned payment data includes the FPAN with the expiration month and the expiration year.CRYPTOGRAM_3DS: This authentication method is associated with cards stored as Android device tokens. Returned payment data includes a 3D Secure (3DS) cryptogram generated on the device.
PAN_ONLY can expose the FPAN, which requires an additional Strong Customer Authentication (SCA) step up to a 3DS check. Currently, we don't support the Google Pay SCA challenge with an FPAN. For the best acceptance, we recommend that you provide only the CRYPTOGRAM_3DS option.
{
  'type': 'CARD',
  'parameters': {
    'allowedAuthMethods': ['PAN_ONLY', 'CRYPTOGRAM_3DS'],
    'allowedCardNetworks': ['AMEX', 'DISCOVER', 'JCB', 'MASTERCARD', 'VISA']
  },
  'tokenizationSpecification': {
    'type': 'PAYMENT_GATEWAY',
    'parameters': {
      'gateway': 'globalpayments',
      'gatewayMerchantId': '<YOUR_MERCHANT_ID>'
    }
  }
}function onGooglePaymentButtonClicked() {
const paymentDataRequest = getGooglePaymentDataRequest();
paymentDataRequest.transactionInfo = getGoogleTransactionInfo();
const paymentsClient = getGooglePaymentsClient();
paymentsClient.loadPaymentData(paymentDataRequest)
.then(function(paymentData) {
// handle the response
processPayment(paymentData);
})
.catch(function(err) {
// show error in developer console for debugging
console.error(err);
});
}
function processPayment(paymentData) {
// show returned data in developer console for debugging
console.log(paymentData);private PaymentDataRequest createPaymentDataRequest() {
PaymentDataRequest.Builder request =
PaymentDataRequest.newBuilder()
.setTransactionInfo(
TransactionInfo.newBuilder()
.setTotalPriceStatus(WalletConstants.TOTAL_PRICE_STATUS_FINAL)
.setTotalPrice("10.00")
.setCurrencyCode("USD")
.build())
.addAllowedPaymentMethod(WalletConstants.PAYMENT_METHOD_CARD)
.addAllowedPaymentMethod(WalletConstants.PAYMENT_METHOD_TOKENIZED_CARD)
.setCardRequirements(
CardRequirements.newBuilder()
.addAllowedCardNetworks(
Arrays.asList(
WalletConstants.CARD_NETWORK_VISA,
WalletConstants.CARD_NETWORK_MASTERCARD))
.build());
PaymentMethodTokenizationParameters params =
PaymentMethodTokenizationParameters.newBuilder()
.setPaymentMethodTokenizationType(
WalletConstants.PAYMENT_METHOD_TOKENIZATION_TYPE_PAYMENT_GATEWAY)
.addParameter("gateway", "globalpayments")
.addParameter("<YOUR_MERCHANT_ID>", "")
.build();
request.setPaymentMethodTokenizationParameters(params);
return request.build();
}public void onActivityResult(int requestCode, int resultCode, Intent data) {
switch (requestCode) {
case LOAD_PAYMENT_DATA_REQUEST_CODE:
switch (resultCode) {
case Activity.RESULT_OK:
PaymentData paymentData = PaymentData.getFromIntent(data);
String token = paymentData.getPaymentMethodToken().getToken();
JSONObject obj = new JSONObject(token);
// Data below goes into the JSON message
string signature = obj.getString("signature");
string protocolVersion = obj.getString("protocolVersion");
string signedMessage = obj.getString("signedMessage");Google will respond with the PaymentData response, which includes the encrypted payload (token). They provide two environments: ENVIRONMENT_TEST and ENVIRONMENT_PRODUCTION. You can process either token type on our platform. You must contact Google before being able to process Production tokens.
For more information, see the Google Pay website.
Process a Google Pay authorization
When creating a transaction, use the digital_wallet object to include the payment token instead of the standard card details.
curl --location --request POST 'https://apis.sandbox.globalpay.com/ucp/transactions' \
--header 'Content-Type: application/json' \
--header 'Authorization: Bearer QeG7aqwDXxyAkqAbOBoDDX5szeC1' \
--header 'Accept: application/json' \
--header 'X-GP-Version: 2020-12-22' \
--data-raw '{
    "account_name": "Transaction_Processing",
    "channel": "CNP",
    "type": "SALE",
    "amount": "5",
    "currency": "EUR",
    "reference": "64970211",
    "country": "US",
    "payment_method": {
        "name": "James Mason",
        "entry_mode": "ECOM",
        "digital_wallet": {
            "provider": "PAY_BY_GOOGLE",
            "payment_token": {

{
                "signature": "MRUCICT82ONC1THeYgGpgj5ruDKZT2o4YaHV2HXPh4RzPZ7UAiEAkp1E8KQxzCN40PPRhvV5gZFacTOuNxm5GWu0oM9x+Kk=",
                "protocolVersion": "ECv1",
                "signedMessage": "{\"encryptedMessage\":\"2e/wvcUDfyIYzf6vyc7bVBJwQTWlW6eKkyylR1+Fvs/2zIqOy+7NlSKkbSaUb926VO6bi1yHfnTDoKqo5LLSqKqo3k6kVsqlyCzLjmMO7ns3YlggKeqI39h16cXRB+qzLbKcrIHJEL/A+pBoAEElSoUYN7nVCdDE6bQbhiUg6zqYOMhXQS/6Kfe1HaYYO8q3nycpieW8mN68iAyQwplwp4LuFOaIWOT8IxBl1y1rAikaPEMptVXVAax2kIesiYhfmcaHBpOdq8fdOIl5VkHtRgSKwvsB1RJQtn3W6/Ovldt1h543Ly1ZYWsJwRyw1wBjhBzniRoJMMNA5BDnwXXb6qQ0Kt2DfJx33zerpOH4bd78EpTRXkQUN+Y2NZ+xYRKwc4xoanA6sOJUJMXQeRZ8PNFCcI7djj/iNlvNYCgMUG/P3ylAPdOc/e9dAUwyR9joJM0C\",\"ephemeralPublicKey\":\"BDVZdkLkavmd3kkBKgNgMW5KF7a6GKXATboPoHUzVJXD3bHz/hAWIBY3dvoM6bWN9W2R1QrdjsGRgSYblDg+cyA\\u003d\",\"tag\":\"G3AOG9uYEeFpd6+lsLA+FTYek+8Pi8ELkSqzLo4XKP8\\u003d\"}"
}Testing Google Pay
You can test Google Pay in our Sandbox environment. The amount specified in the request will map the tokenized data in the transaction to one of our test cards. For example, an amount of 10.00 will map to the successful Visa test card. For further details, see the Google Pay section in our Test Cards article.
Brand guidelines
For branding guidelines and to download assets, see the Brand Guidelines on the Google Pay website.
For the detailed API specification and a full list of features, see the API Explorer.