We support Apple Pay, but it's not supported by all acquirers and is not enabled by default on your account. For more information, contact a member of our support team.
Apple Pay provides a highly secure, instant payment experience. It allows users to securely store their card details on a Secure Element built into their Apple product and to use those card details to make payments. It can be used on the Hosted Payment Page (HPP) to provide payment for real-world goods and services.
This guide focuses on implementing Apple Pay on the HPP via full-page redirect or iFrame and Lightbox, with steps for both SDK and non-SDK integrators. We also provide information on disabling Apple Pay for certain transactions, how to test your integration, and a preview of what Apple Pay looks like once successfully implemented (rollout).
Prerequisites
To use Apple Pay on the HPP:
- You must be using one of these certified acquirers:
- Global Payments, Amex, or Barclays
- Your device must be either an:
- iPhone, iPad, or Macbook
- Your web browser must be:
- Safari, Chrome, or Mozilla
Implementation process
Full-page redirect
To add Apple Pay as a payment option using full-page redirect (checkout starts and finishes on our domain), you simply need to contact customer support to enable the feature. The implementation process typically includes the following steps:
- Contact customer support – Reach out to customer support or your account manager to initiate the request to enable Apple Pay for your account. Be sure to provide the client IDs and the sub accounts you want to enable, along with your website for registration.
- Enable Apple Pay feature – Upon receiving the request, customer support will proceed to enable Apple Pay support for your account. This involves backend configurations and activations to ensure that your payment processing system is compatible with Apple Pay transactions.
iFrame and Lightbox
To integrate Apple Pay with a checkout using an iFrame or Lightbox, there are extra steps to take to ensure that your domain is registered with Apple.
For SDK integrators:
- Ensure that you are using the most up-to-date version of our SDK.
- Create a .txt file and name it:
apple-developer-merchantid-domain-association
- Add the certification contents of this file to the file, and then upload to the .well-known folder in any/every root domain that hosts the HPP’s iFrame.
The URL should look like this:
https://YOURWEBSITE.COM/.well-known/apple-developer-merchantid-domain-association
Where "YOURWEBSITE.COM" is the root URL of your website.
- Once this is complete, contact customer support with your URL so we can add it to our list of accepted domains for Apple Pay. In most cases, we can do this instantly, but if not, we'll contact you when it’s complete.
It’s possible to add multiple URLs to your account as long as each root url contains a /.well-known file that follows the processes above.
For non-SDK integrators:
Payment processing with Apple Pay within a cross-origin iFrame requires a Permissions Policy and requires the payment page to allow third-party payments. If this is not done, the button won’t show in the iFrame. For this reason, it’s important to ensure that your checkout iFrame is structured like so:
<iframe src="checkout_URL" allow="payment"></iframe>
Where checkout_URL is the URL dynamically generated by us.
Sandbox example:
<iframe src="https://pay.sandbox.realexpayments.com/hosted-payments/blue/card.html?guid=5eed61f1-48cd-4393-b020-9aa1bd03c692"allow="payment"></iframe>
Production example:
<iframe src="https://pay.realexpayments.com/hosted-payments/blue/card.html?guid=5eed61f1-48cd-4393-b020-9aa1bd03c692"allow="payment"></iframe>
The src attribute values dynamically change on each checkout.
Once this is complete, you can follow the steps above for SDK integrators to register your domain.
For information on cross-origin resource sharing (CORS), see the definition on Mozilla’s MDN website.
Disable for some transactions
In certain circumstances, merchants enabled for Apple Pay may not want to offer this option at all times. To achieve this, you can hide the Apple Pay option displayed on the HPP for a particular request by sending HPP_ENABLE_APPLEPAY = False in the HPP POST request.
| Field | Description |
|---|---|
| HPP_ENABLE_APPLEPAY | Determines whether the Apple Pay button displays on the HPP. Works only when Apple Pay is enabled. Allowed value: False - Hides the Apple Pay button on the HPP. |
Testing and integration
Apple Pay is available for testing in our Sandbox environment. For the full list of Apple Pay test values, see our Test Cards article.
To complete testing in Apple’s sandbox and access their test cards, you first need to set up an Apple account. More information can be found on Apple's website.
The amount specified in the request will map the tokenized data in the transaction to one of Apple's test values. For example, an amount of 10.00 will map to the successful Visa test card.
Once Apple Pay support is enabled, you should conduct testing in our Sandbox to ensure that your integration is seamless and functional. This may involve testing transactions using Apple devices at the point of sale on the HPP.
Rollout
After successful testing, you can proceed with the rollout of Apple Pay as a payment option for customers.
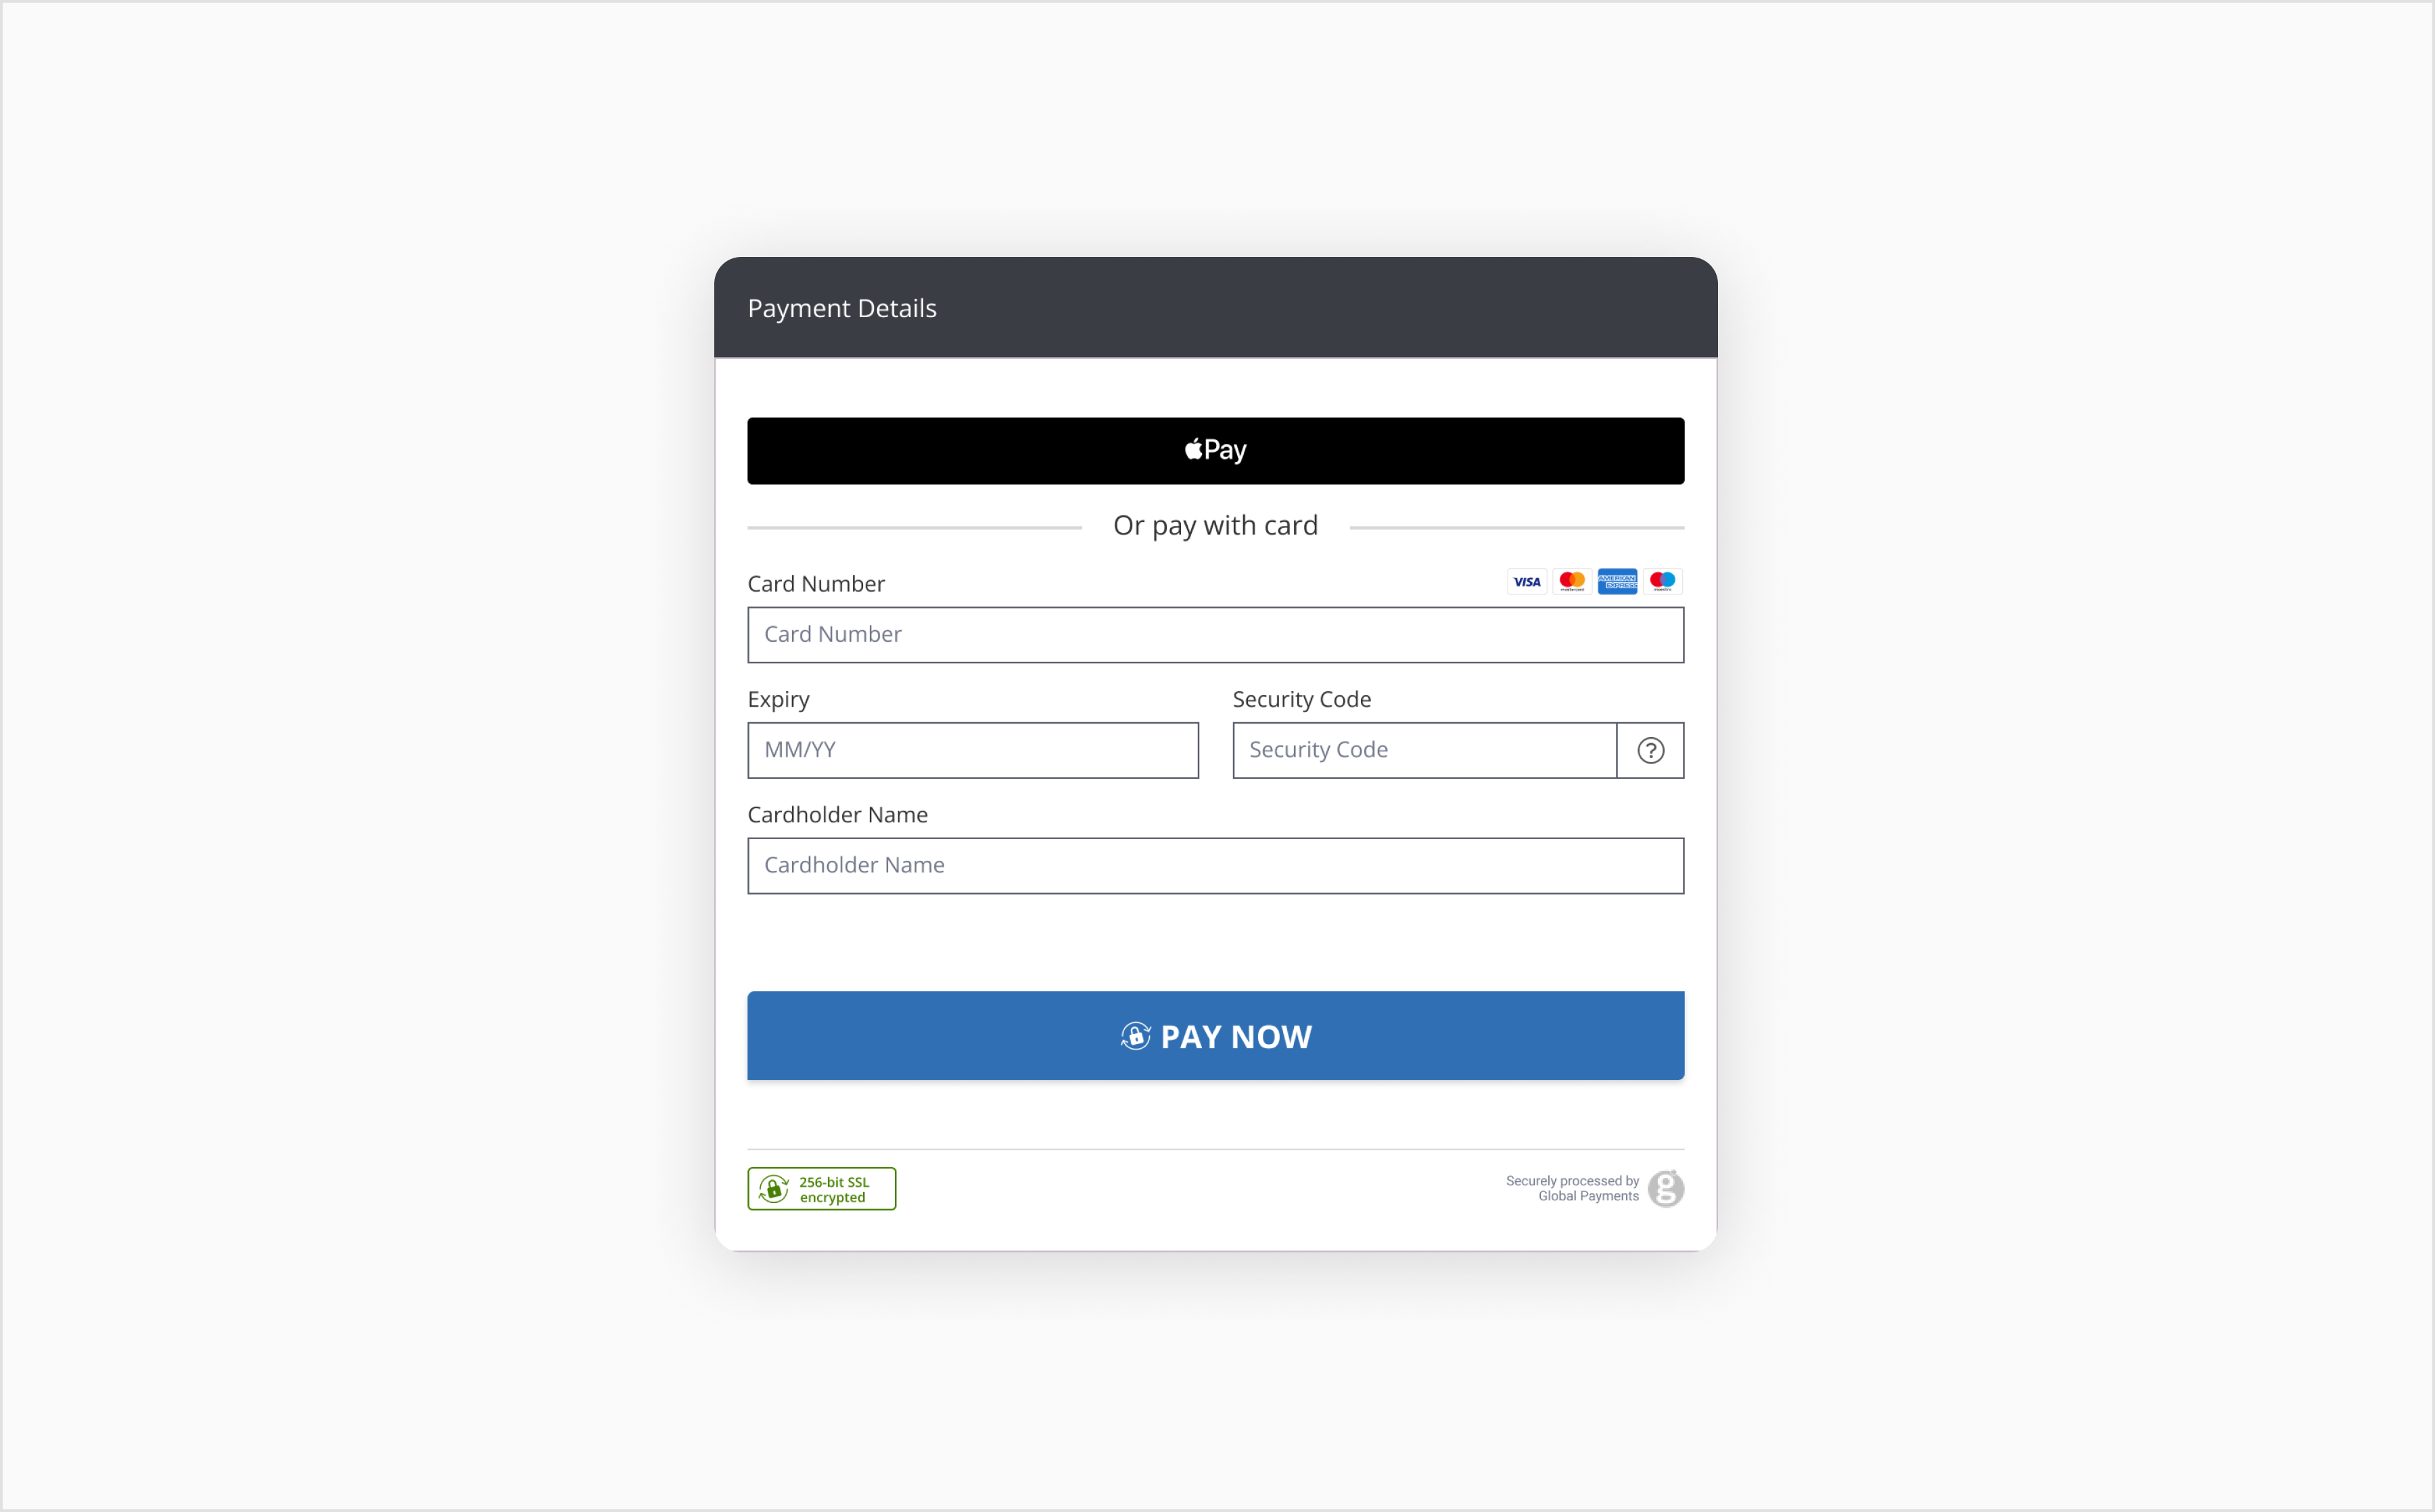
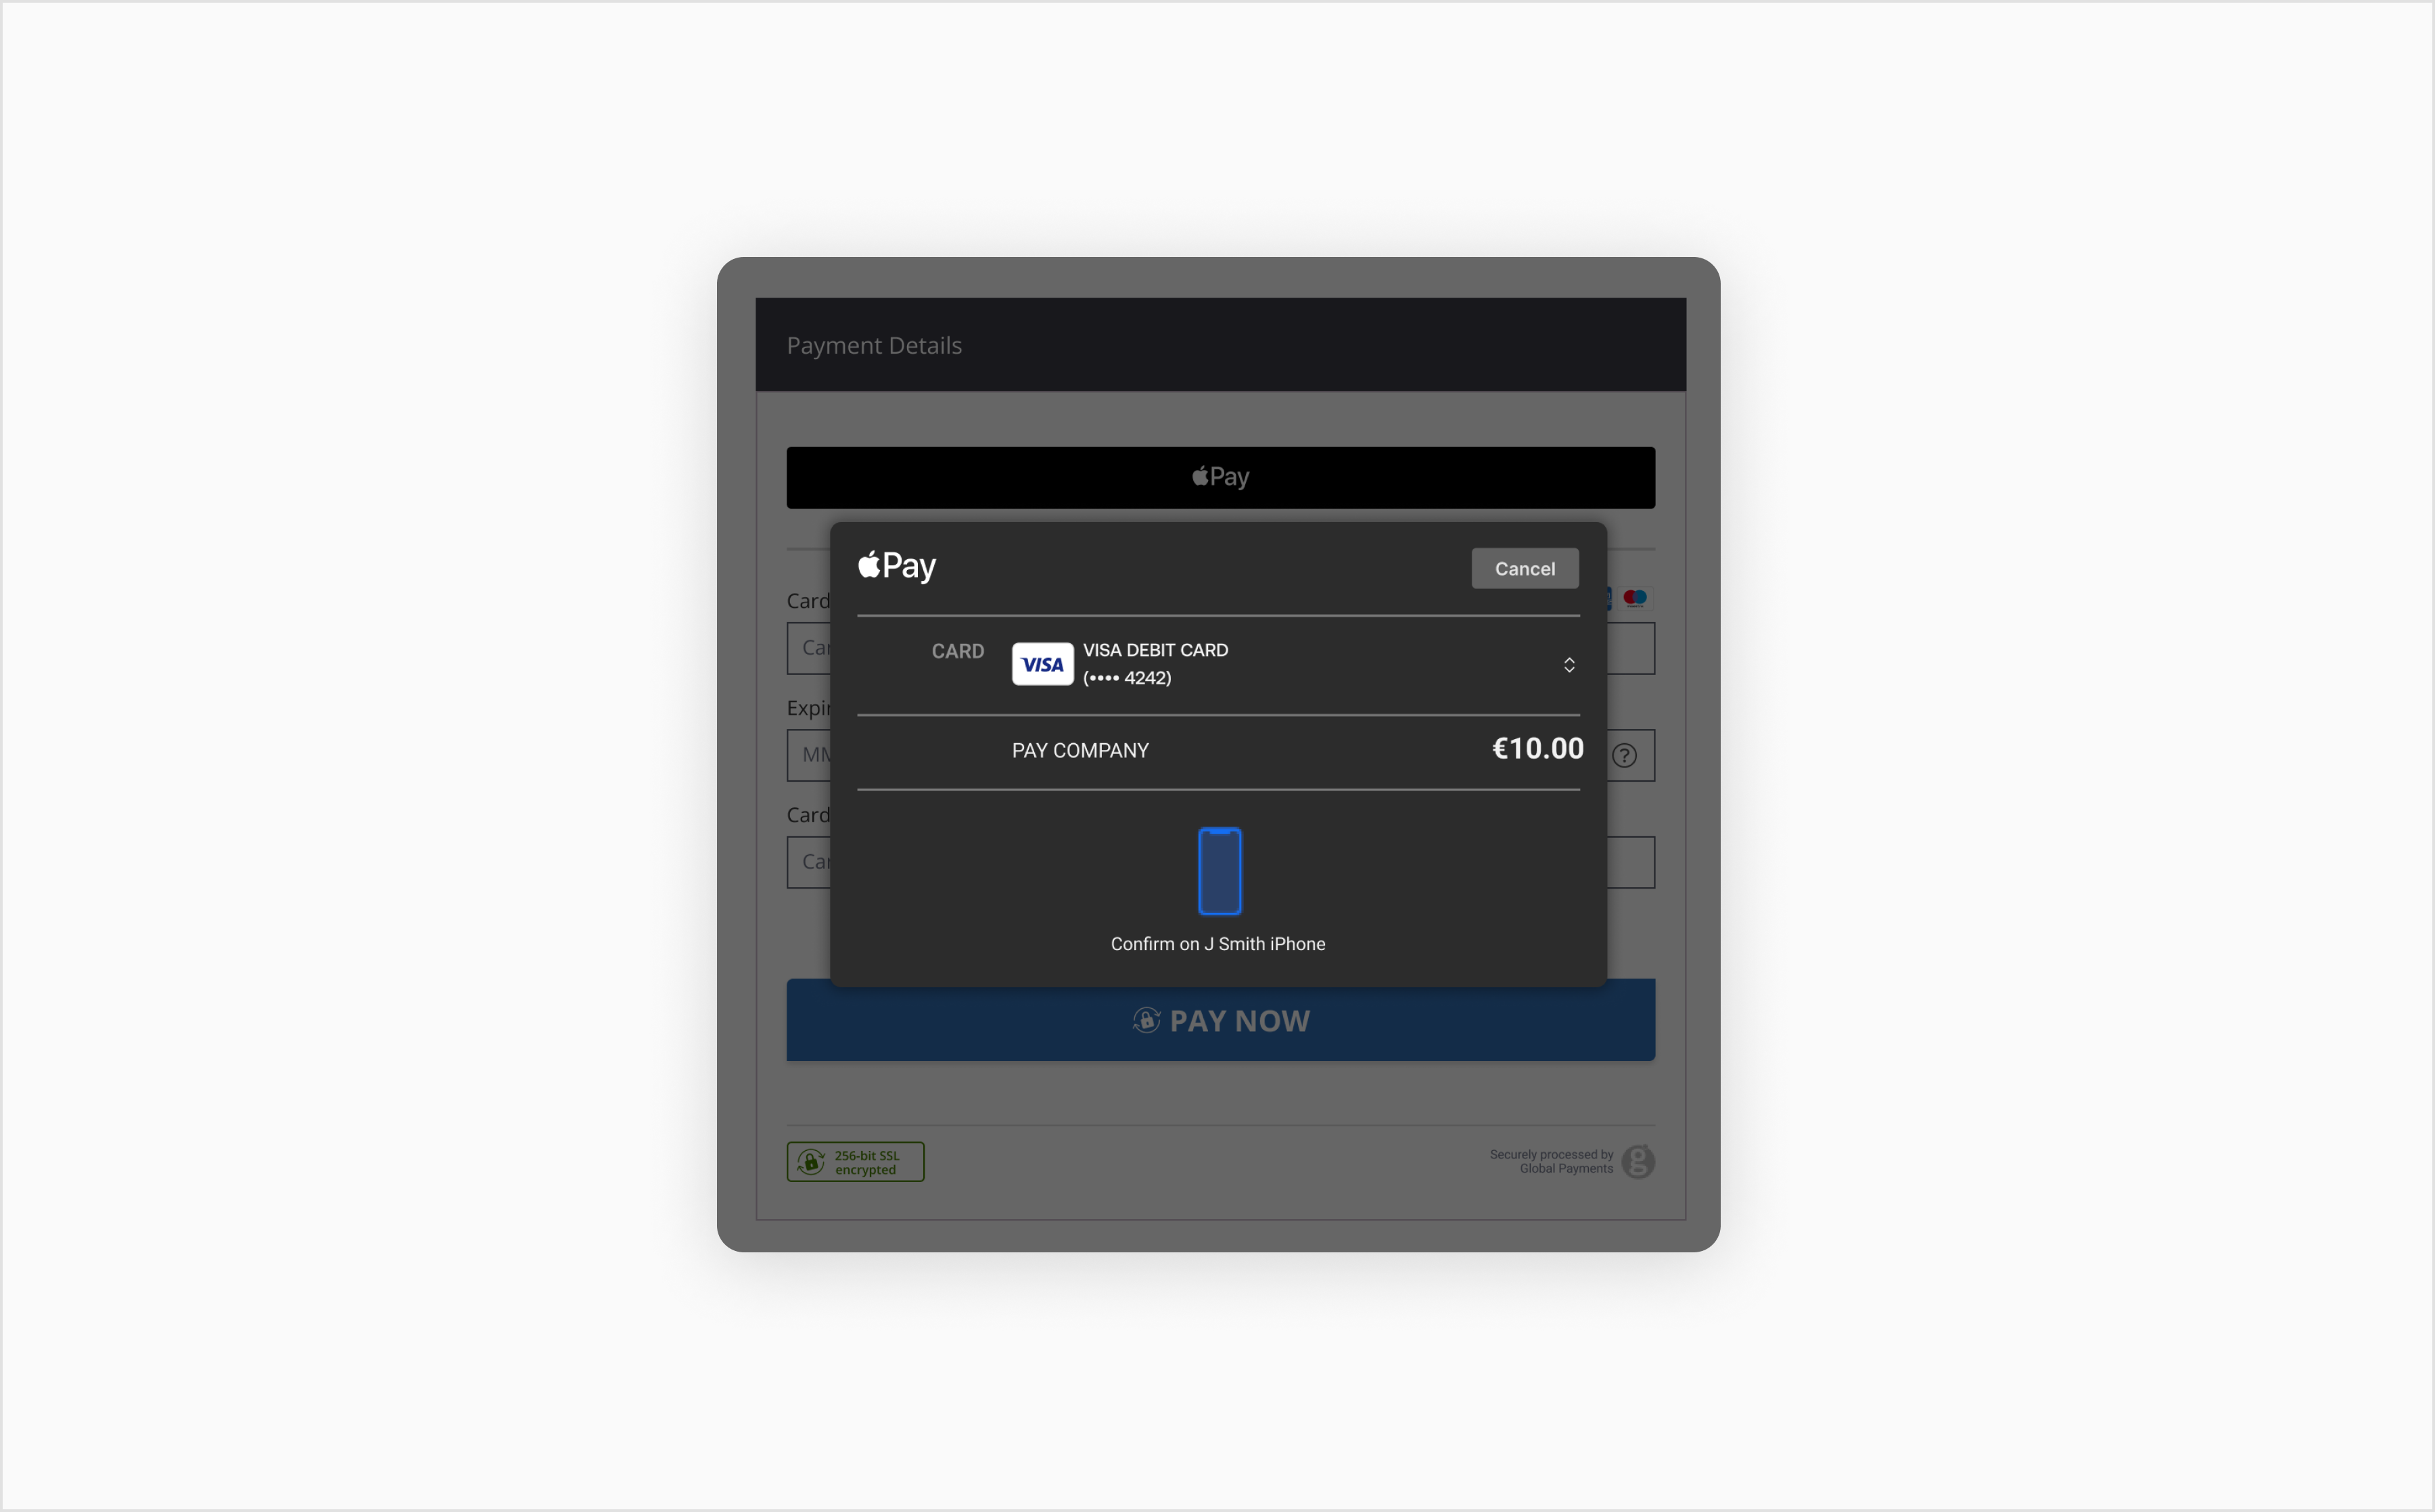
Apple Pay provides a highly secure instant payment experience. It allows users to securely store their card details on a Secure Element built into their Apple product and to use those card details to make payments. It can be used in-app or on the web to provide payment for real-world goods and services.
This guide focuses on integrating Apple Pay directly using our XML API. In addition to following some necessary setup steps with Apple, you’ll learn how to obtain and process the Apple Pay token as well as process an authorization.
Prerequisites
You need:
- An API integration with us
- An Apple developer account
- Apple Pay to be enabled on your account
Registration
The first thing you need is an Apple developer account. You can sign up for one on the Apple developer website.
Set up the Apple Merchant ID
Create an Apple Merchant ID through the Apple developer website.
Integration overview
To add the Apple Pay functionality to a mobile application (in-app) or website (in-browser), perform the following steps.
In-app and in-browser:
- Create merchant identifiers in your Apple developer account.
- Enable the Apple Pay capabilities on the Apple developer website.
- Create a payment processing certificate for each merchant identifier, and upload the certificate into our Ecommerce Portal.
Note: Apple Pay uses this certificate to encrypt payment information, and we need to have this certificate to be able to decrypt and process the payment.
In-browser only (additional steps):
- Register and validate your merchant domain with Apple.
- Create a Merchant Identity Certificate, convert it to two PEM files, and upload to your server.
Note: This certificate is used to authenticate communication with the Apple Pay servers (within the Validate Merchant step).
Integrate with Apple Pay
Integrate into Apple Pay to obtain the encrypted payment credentials. Follow the relevant Apple guides below:
Create and upload a certificate
This step involves downloading a Certificate Signing Request (CSR) from Ecommerce Portal and uploading it to Apple. This will create the necessary Apple Pay certificate. You can then upload this certificate back to Ecommerce Portal so that you can process Apple Pay authorizations with your Client ID with us.
- Log in to your account with us via Ecommerce Portal:
- On the Client Settings tab, navigate to the Apple Pay section. Click the Obtain CSR button to generate and download a new certificate.
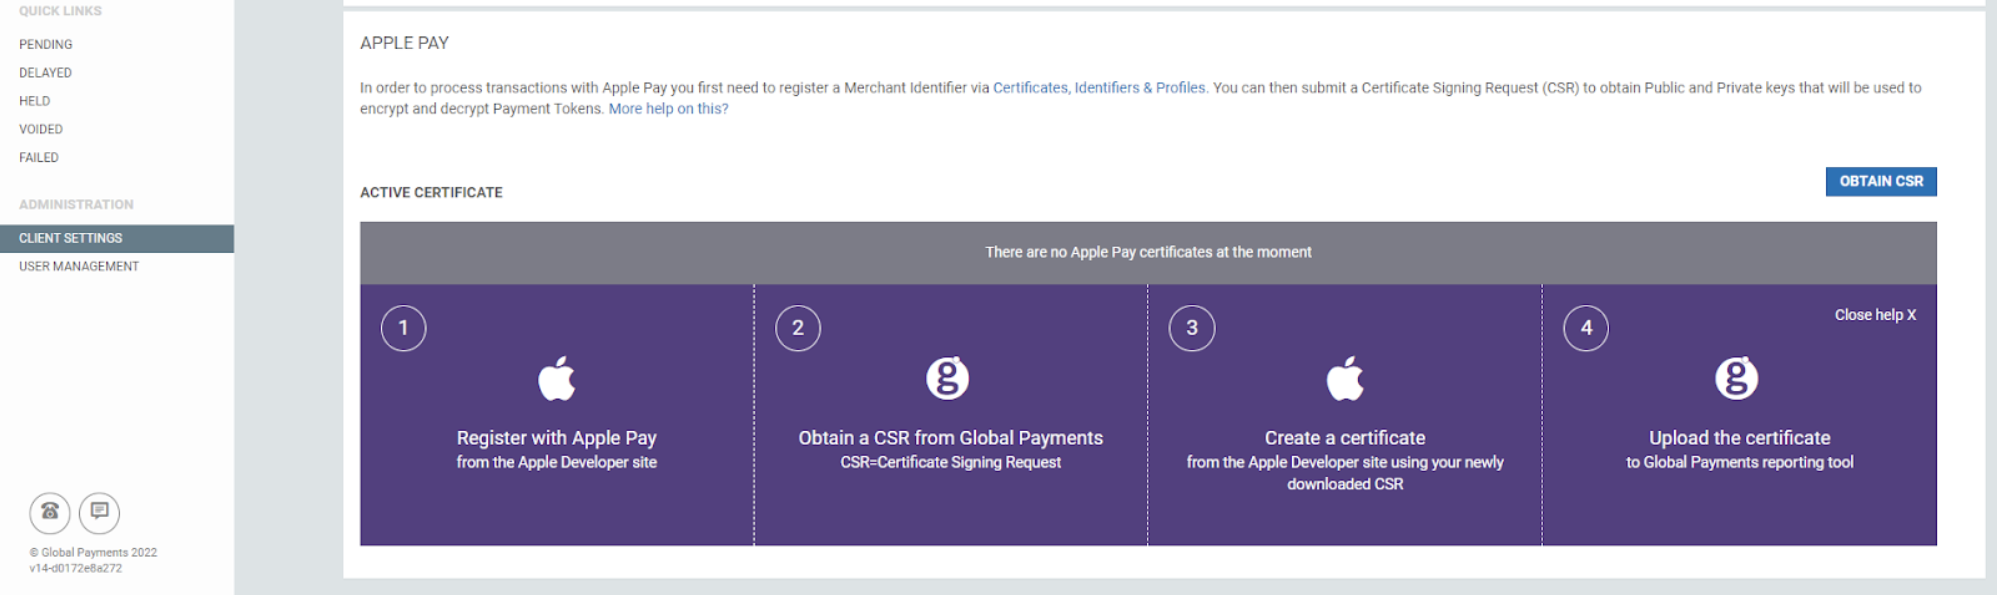
- After downloading the CSR, go to your Apple developer account. Under the Identifiers tab on the top right corner, select Merchant IDs. Select your project, and then click the Create Certificate button.
Obtain an Apple Pay token
How to obtain an Apple Pay token is outlined in the "Working with Payment Requests" section of the Apple Pay Programming Guide. You'll need to ensure that the device and user can make payments and include the transaction details (currency code, amount, merchant identifier) along with billing and shipping information.
When the user authorizes that the payment can be made, the token is created through a combination of Apple's server and the Secure Element on the device. Once you have the token, you can send it to our API to be processed. The same goes for both in-app and in-browser integrations. Find the applicable instructions in the following links:
Process an Apple Pay authorization
Using the Auth-Mobile request type, include the token obtained from the device instead of the standard card details captured from the customer.
// configure client & request settings
GatewayConfig config = new GatewayConfig();
config.setMerchantId("MerchantId");
config.setAccountId("internet");
config.setSharedSecret("secret");
config.setServiceUrl("https://api.sandbox.realexpayments.com/epage-remote.cgi");
ServicesContainer.configureService(config);

// create the card object
CreditCardData card = new CreditCardData();
card.setToken("{\"version\":\"EC_v1\",\"data\":\"dvMNzlcy6WNB\",\"header\":{\"ephemeralPublicKey\":\"MFkwEwYHKoZIzj0CAQYIKoZIzj0DAQcDQgAEWdNhNAHy9kO2Kol33kIh7k6wh6E\","
+ "\"transactionId\":\"fd88874954acdb299c285f95a3202ad1f330d3fd4ebc22a864398684198644c3\",\"publicKeyHash\":\"h7WnNVz2gmpTSkHqETOWsskFPLSj31e3sPTS2cBxgrk\"}}");
card.setMobileType(MobilePaymentMethodType.APPLEPAY);

try {
   // process an auto-capture authorization
   Transaction response =
                   card
                       .charge(new BigDecimal("19.99"))
                       .withCurrency("EUR")
                       .execute();
   String result = response.getResponseCode(); // 00 == Success
   String message = response.getResponseMessage(); // [ test system ] AUTHORISED
   // get the details to save to the DB for future requests
   String orderId = response.getOrderId(); // ezJDQjhENTZBLTdCNzNDQw
   String authCode = response.getAuthorizationCode(); // 12345
   String paymentsReference = response.getTransactionId(); // pasref 14622680939731425
   String schemeReferenceData = response.getSchemeId(); // MMC0F00YE4000000715
}
catch (ApiException exce) {
   // TODO: add your error handling here
}<?php
require_once ('vendor/autoload.php');
use GlobalPayments\Api\ServiceConfigs\Gateways\GpEcomConfig;
use GlobalPayments\Api\ServicesContainer;
use GlobalPayments\Api\PaymentMethods\CreditCardData;
use GlobalPayments\Api\Entities\Enums\EncyptedMobileType;
use GlobalPayments\Api\Entities\Enums\TransactionModifier;
use GlobalPayments\Api\Entities\Exceptions\ApiException;
use GlobalPayments\Api\Entities\Transaction;
$config = new GpEcomConfig();
$config->merchantId = "MerchantId";
$config->accountId = "internet";
$config->sharedSecret = "secret";
$config->serviceUrl = "https://api.sandbox.realexpayments.com/epage-remote.cgi";
ServicesContainer::configureService($config);
// create the card object
$card = new CreditCardData();
$card->token = '{"version":"EC_v1","data":"dvMNzlcy6WNB","header":{"ephemeralPublicKey":"MFkwEwYHKoZIzj0CAQYIKoZIzj0DAQcDQgAEWdNhNAHy9kO2Kol33kIh7k6wh6E",'
.'transactionId":"fd88874954acdb299c285f95a3202ad1f330d3fd4ebc22a864398684198644c3","publicKeyHash":"h7WnNVz2gmpTSkHqETOWsskFPLSj31e3sPTS2cBxgrk"}}';
$card->mobileType = EncyptedMobileType::APPLE_PAY;
$response = new Transaction();
try {
// process an auto-capture authorization
$response = $card->charge(19.99)
->withModifier(TransactionModifier::ENCRYPTED_MOBILE)
->withCurrency('EUR')
->execute();
} catch (ApiException $e) {
// TODO: add your error handling here
}
if (isset($response)) {
$result = $response->responseCode; // 00 == Success
$message = $response->responseMessage; // [ test system ] AUTHORISED
// get the details to save to the DB for future requests
$orderId = $response->orderId; // N6qsk4kYRZihmPrTXWYS6g
$authCode = $response->authorizationCode; // 12345
$paymentsReference = $response->transactionId; // pasref: 14610544313177922
$schemeReferenceData = $response->schemeId; // MMC0F00YE4000000715
}// configure client & request settings
ServicesContainer.ConfigureService(new GpEcomConfig
{
MerchantId = "MerchantId",
AccountId = "internet",
SharedSecret = "secret",
ServiceUrl = "https://api.sandbox.realexpayments.com/epage-remote.cgi"
});
// create the token object
var token = new CreditCardData
{
Token = "{\"version\":\"EC_v1\",\"data\":\"dvMNzlcy6WNB\",\"header\":{\"ephemeralPublicKey\":\"MFkwEwYHKoZIzj0CAQYIKoZIzj0DAQcDQgAEWdNhNAHy9kO2Kol33kIh7k6wh6E\","
+ "\"transactionId\":\"fd88874954acdb299c285f95a3202ad1f330d3fd4ebc22a864398684198644c3\",\"publicKeyHash\":\"h7WnNVz2gmpTSkHqETOWsskFPLSj31e3sPTS2cBxgrk\"}}",
MobileType = MobilePaymentMethodType.APPLEPAY
};
try
{
// process an auto-capture apple pay authorization
Transaction response = token.Charge(19.99m)
.WithCurrency("EUR")
.Execute();
// get the response details to save to the DB for future requests
var orderId = response.OrderId; // ezJDQjhENTZBLTdCNzNDQw
var authCode = response.AuthorizationCode; // 12345
var paymentsReference = response.TransactionId; // pasref 14622680939731425
var schemeReferenceData = response.SchemeId; // MMC0F00YE4000000715
}
catch (ApiException exce)
{
// TODO: add your error handling here
}<?xml version="1.0" encoding="UTF-8"?>
<request timestamp="20180614095601" type="auth-mobile">
<merchantid>MerchantId</merchantid>
<account>internet</account>
<orderid>N6qsk4kYRZihmPrTXWYS6g</orderid>
<mobile>apple-pay</mobile>
<amount currency="EUR">1999</amount>
<token>{"version":"EC_v1","data":"Ft+dvMNzlcy6WNB+zerKtkh/RWW4RWW4yXIRgmM3WC/FYEC6Z+OJEzir2sDyzDkjIUJ0TFCQd/QAAAAAAAA==","header":{"ephemeralPublicKey":"MFkwEwYHKoZIzj0CAQYIKoZIzj0DAQcDQgAEWdNhNAHy9kO2Kol33kIh7k6wh6E/lxriM46MR1FUrn7SHugprkaeFmWKZPgGpWgZ+telY/G1+YSoaCbR5YSoaCbR57bdGA==","transactionId":"fd88874954acdb299c285f95a3202ad1f330d3fd4ebc22a864398684198644c3","publicKeyHash":"h7WnNVz2gmpTSkHqETOWsskFPLSj31e3sPTS2cBxgrk="}}</token>
<autosettle flag="1"/>
<sha1hash>3231aebe4b60fe23fda3c0ad1b26f03b3ea081e2</sha1hash>
</request>Testing
You can test Apple Pay in our Sandbox environment. The amount specified in the token will map the tokenized data in the transaction to one of our test cards. For example, an amount of 10.00 will map to the successful Visa test card. For further details, see the Apple Pay section in our Test Cards article.
Explore more functionality to enrich your application or website. For the detailed API specification and a full list of features, see the API Reference section.