To see if our Installment Service can be used with your Acquirer, contact your Global Payments account manager.
Currently, our Installment Service is available to merchants in Canada who use Global Payments as their Acquirer.
For more information on our Installment Service, see our Overview.
In this guide, you'll learn how to integrate Installment Service with the Hosted Payment Page (HPP) and how to use it to offer installment payments to your customers.
Step 1: Set up the service
To use our Installment Service, you first need to get it enabled on your account. To do this, contact your Global Payments account manager.
Setting up the service for HPP integration typically works like this:
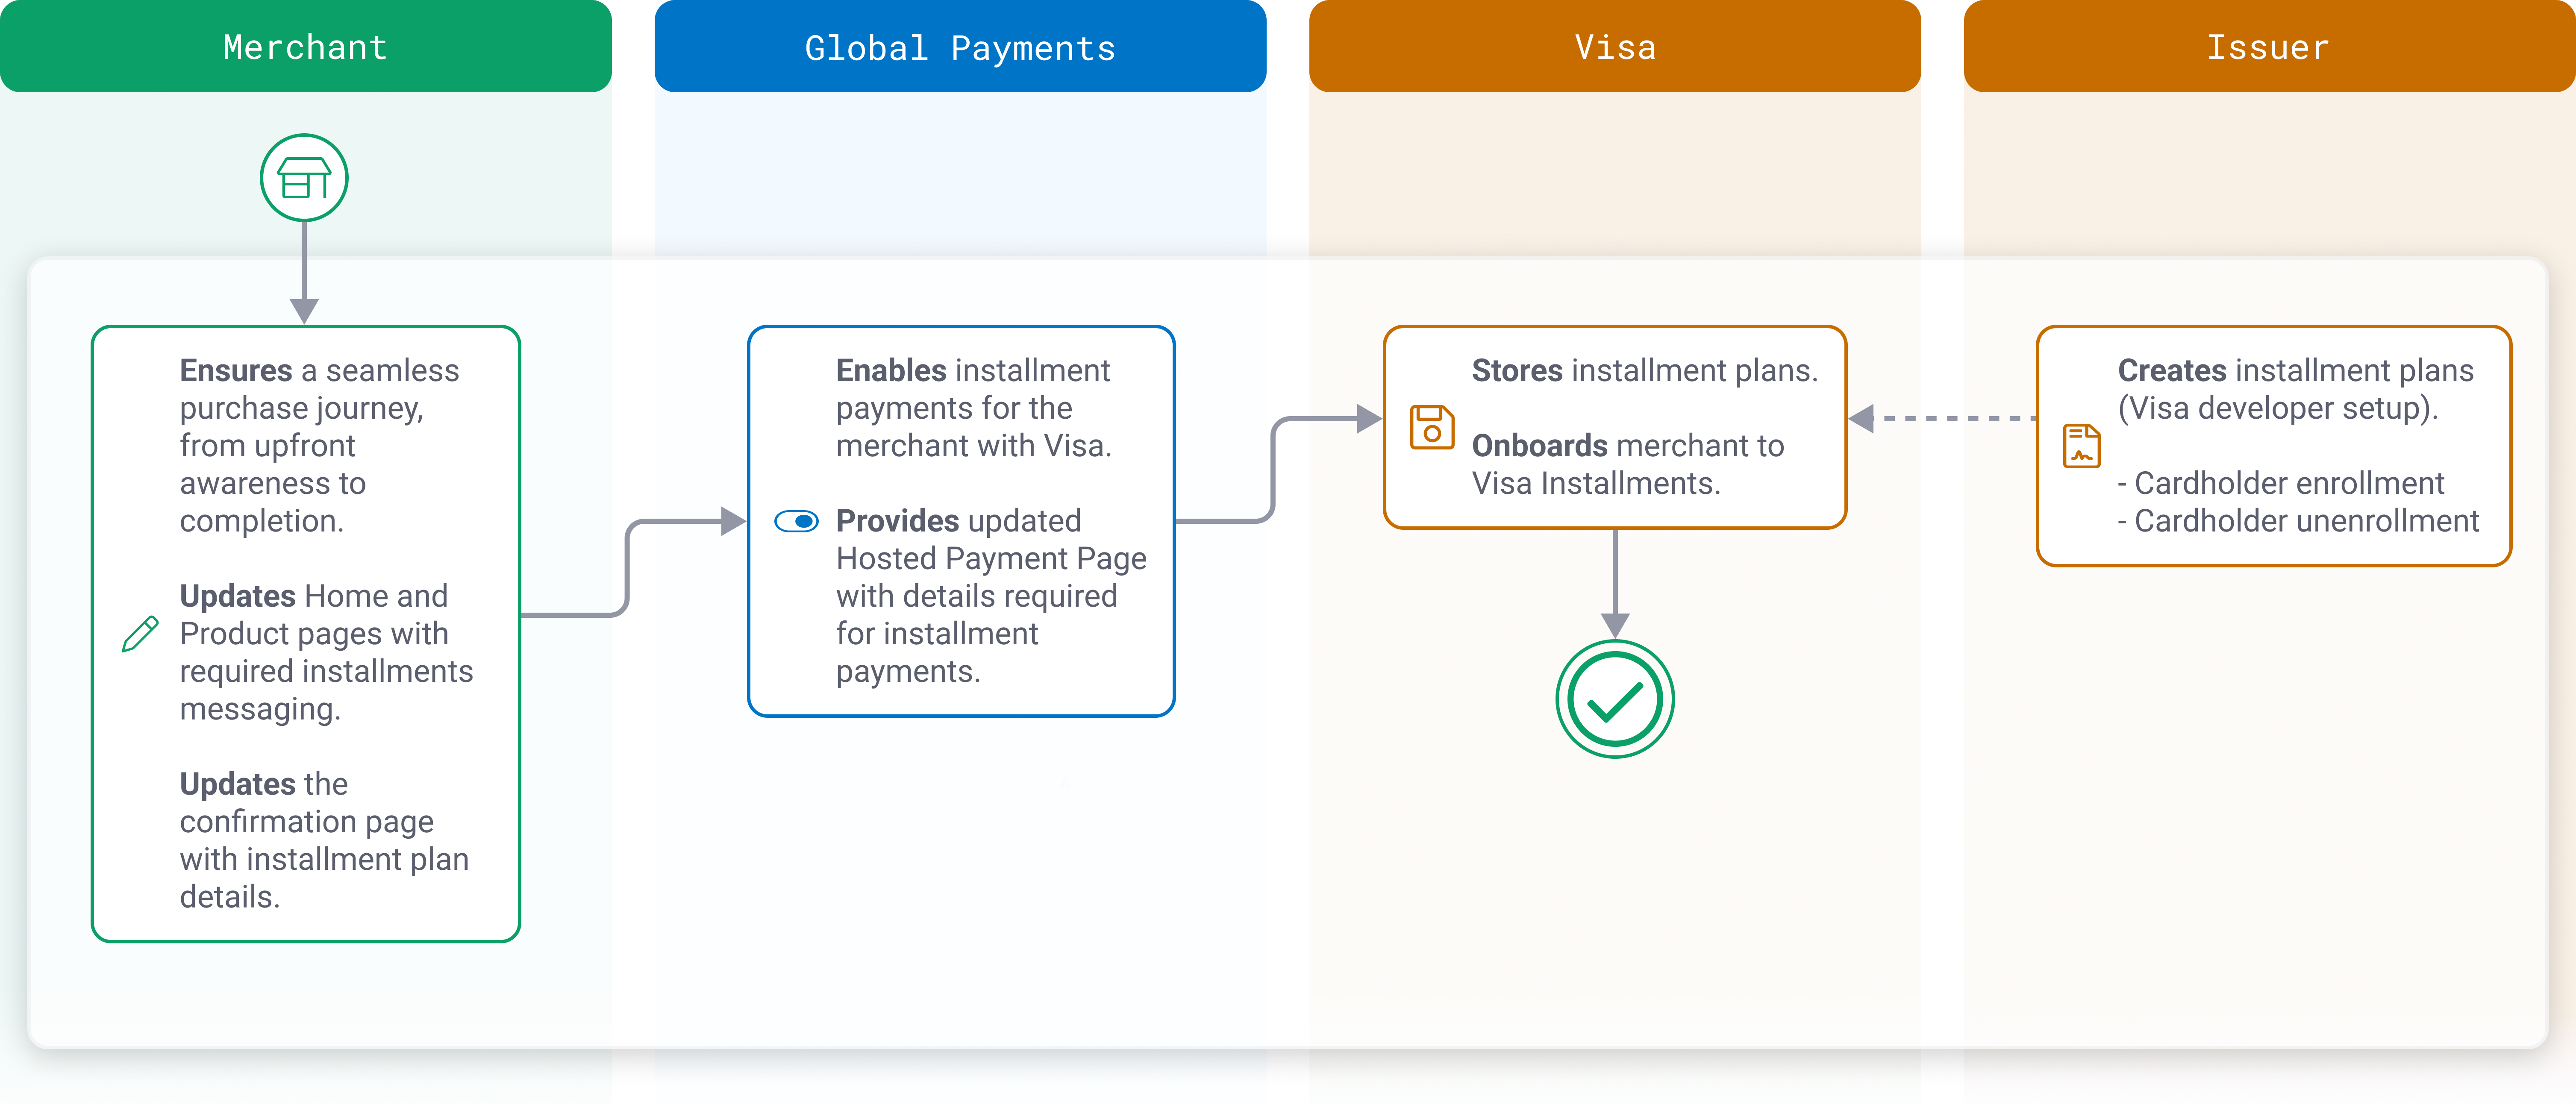
Step 2: Select and confirm plan
Use the dropdown arrow to select how you want to perform this step: Card on File or Guest Checkout.
Card on File
In this scenario, a customer with an existing account pays with a saved card.
- In the Payment Details section, expand Pay with a saved card, and select a card that is eligible for installments.
Note: Look for the green “Eligible for Installments” label as shown below.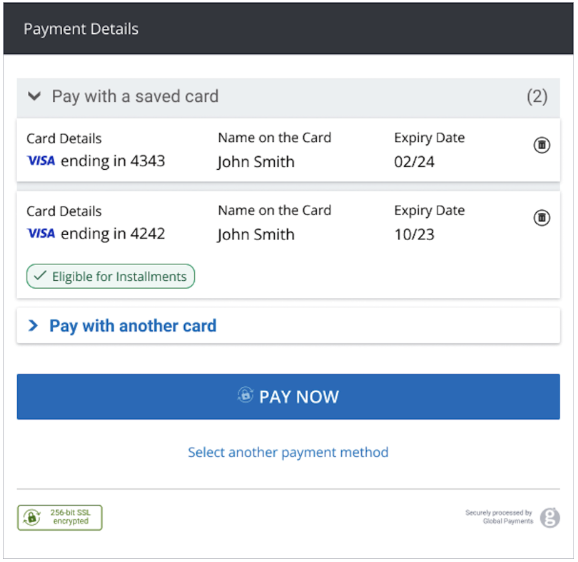
- Choose an installment plan.
Note: The default card payment option is “PAY IN FULL.” If available, up to two installment plans will be displayed underneath the default.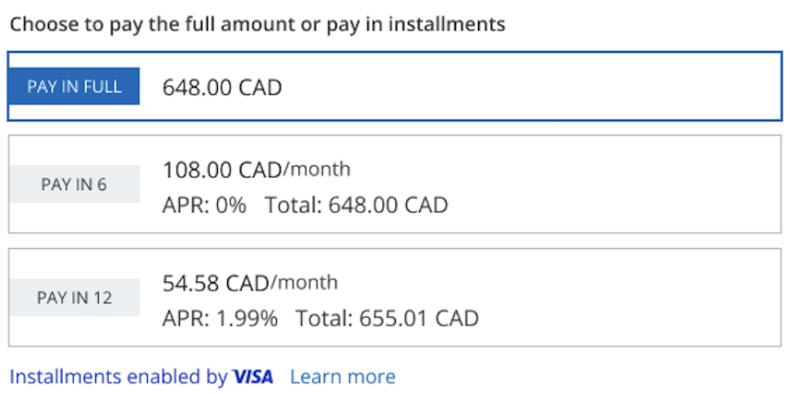
- Review the terms and conditions (T&Cs) of the selected installment plan. When finished, select the acknowledgement checkbox.
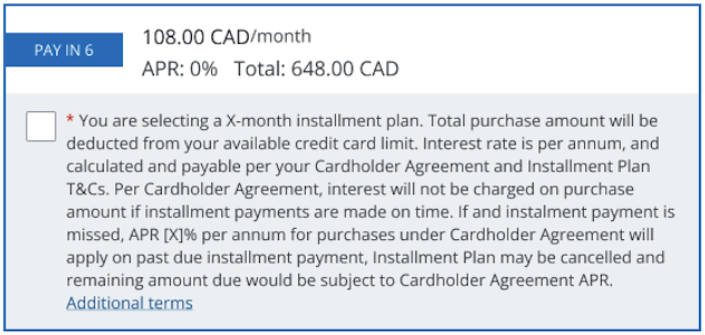
The expanded details of the selected installment plan include the following:
–Number of installments (for example, Pay In 6)
–Frequency of payments (for example, per month)
–Installment payment amount (for example, 108.00 CAD/month)
–Total fees per installment plan.
Note: in the UK and Canada, the annual percentage rate (APR) is required for display (for example, APR: 0%).
–Total amount inclusive of fees (for example, 648.00 CAD)
–Description of the T&Cs
–Hyperlinked URL (additional terms within T&Cs) - Click Pay Now. The payment is processed with the selected installment plan.
Guest Checkout
In this scenario, a customer checking out as a guest pays with another card.
- In the Payment Details section, expand Pay with another card.
- Input the information for the new card. Once a card number is entered, the available installment plans will be displayed.
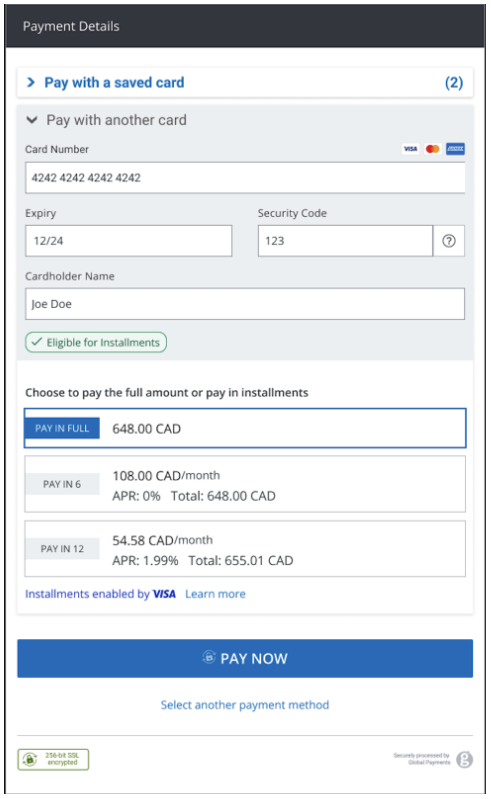
- Choose an installment plan.
Note: The default card payment option is “PAY IN FULL.” If available, up to two installment plans will be displayed underneath the default. - Review the T&Cs of the selected installment plan. When finished, select the acknowledgement checkbox.
The expanded details of the selected installment plan include the following:
–Number of installments (for example, Pay In 6)
–Frequency of payments (for example, per month)
–Installment payment amount (for example, 108.00 CAD/month)
–Total fees per installment plan.
Note: in the UK and Canada, the APR is required for display (for example, APR: 0%).
–Total amount inclusive of fees (for example, 648.00 CAD)
–Description of the T&Cs
–Hyperlinked URL (additional terms within T&Cs) - Click Pay Now. The payment is processed with the selected installment plan.
Step 3: Display confirmation details
When displaying plan details, you must comply with the messaging options in our Installments Enabled by Visa UX Guide. For more information, see the Display installment plan details section.
Once the payment is processed with the installment plan and the payment is complete, you should then display the details on the confirmation page. For an example, see our Installments Enabled by Visa UX Guide. To download the guide, see the Display installment plan details section.
The HPP response includes the following plan details, which you can use in your confirmation page display.
INS_number_of_installmentsINS_installment_frequencyINS_instalment_payment_amountINS_total_feesINS_annual_percentage_rateINS_total_plan_costINS_currencyINS_terms_and_conditions_textINS_terms_and_conditions_url
For details on the syntax of the HPP response, see Installment Service in the HPP Reference.
Language support
The following languages are supported for Installment Service:
- English
- Canadian French
For translation assistance, contact your Global Payments account manager.
Filtering installment plans
You can filter installment plans by sending the following filter parameters in the request:
HPP_PLAN_TYPEHPP_MAX_TERM_MONTHS_MERCHANT_FUNDEDHPP_AMOUNT_THRESHOLD
If available, up to two installment plans will be displayed on the HPP.
In the following example, both plans are CONSUMER_FUNDED on the HPP if available for a specific user.
{
"TIMESTAMP": "20240311160300",
"MERCHANT_ID": "vayuvisa",
"ACCOUNT": "installment",
"CURRENCY": "CAD",
"AMOUNT": "45000",
"ORDER_ID": "853f6574-b02c-4cae-8e14-26506ab69809",
"AUTO_SETTLE_FLAG":"0",
"HPP_PLAN_TYPE":"CONSUMER_FUNDED",
"HPP_MAX_TERM_MONTHS_MERCHANT_FUNDED":"",
"HPP_AMOUNT_THRESHOLD":"",
"SHA1HASH": "7c5be41124b37c40f3b8851ad2dd1bc11a70a972"
}Display installment plan details
Although not required, you can display installment plan details on other pages of your website or application, such as on the homepage or various product pages. Doing so can raise awareness of these payment options during the shopping process and can lead to higher customer conversion rates.
If you decide to display plan details on other pages, you must use the messaging options we provide in our Installments Enabled by Visa UX Guide. The guide focuses on information visibility in ecommerce transactions and includes design requirements and marketing guidelines to help you get started.
To download the guide, click the button below.
Testing Installment Service
Our Installment Service solution is available for testing in our Sandbox environment for registered users of this developer portal. Use our test cards to try different scenarios for your application to handle.
For more information, see the Installments section of our Test Cards article.
Enhance your solution
Explore more functionality to enrich your application. For the detailed HPP specification and a full list of features, see the HPP Reference.
In this guide, you'll learn how to directly integrate with Installment Service and how to use it to offer installment payments to your customers.
The code samples in this guide are provided in JSON as well as XML.
Step 1: Set up the service
To use our Installment Service, you first need to get it enabled on your account. To do this, contact your Global Payments account manager.
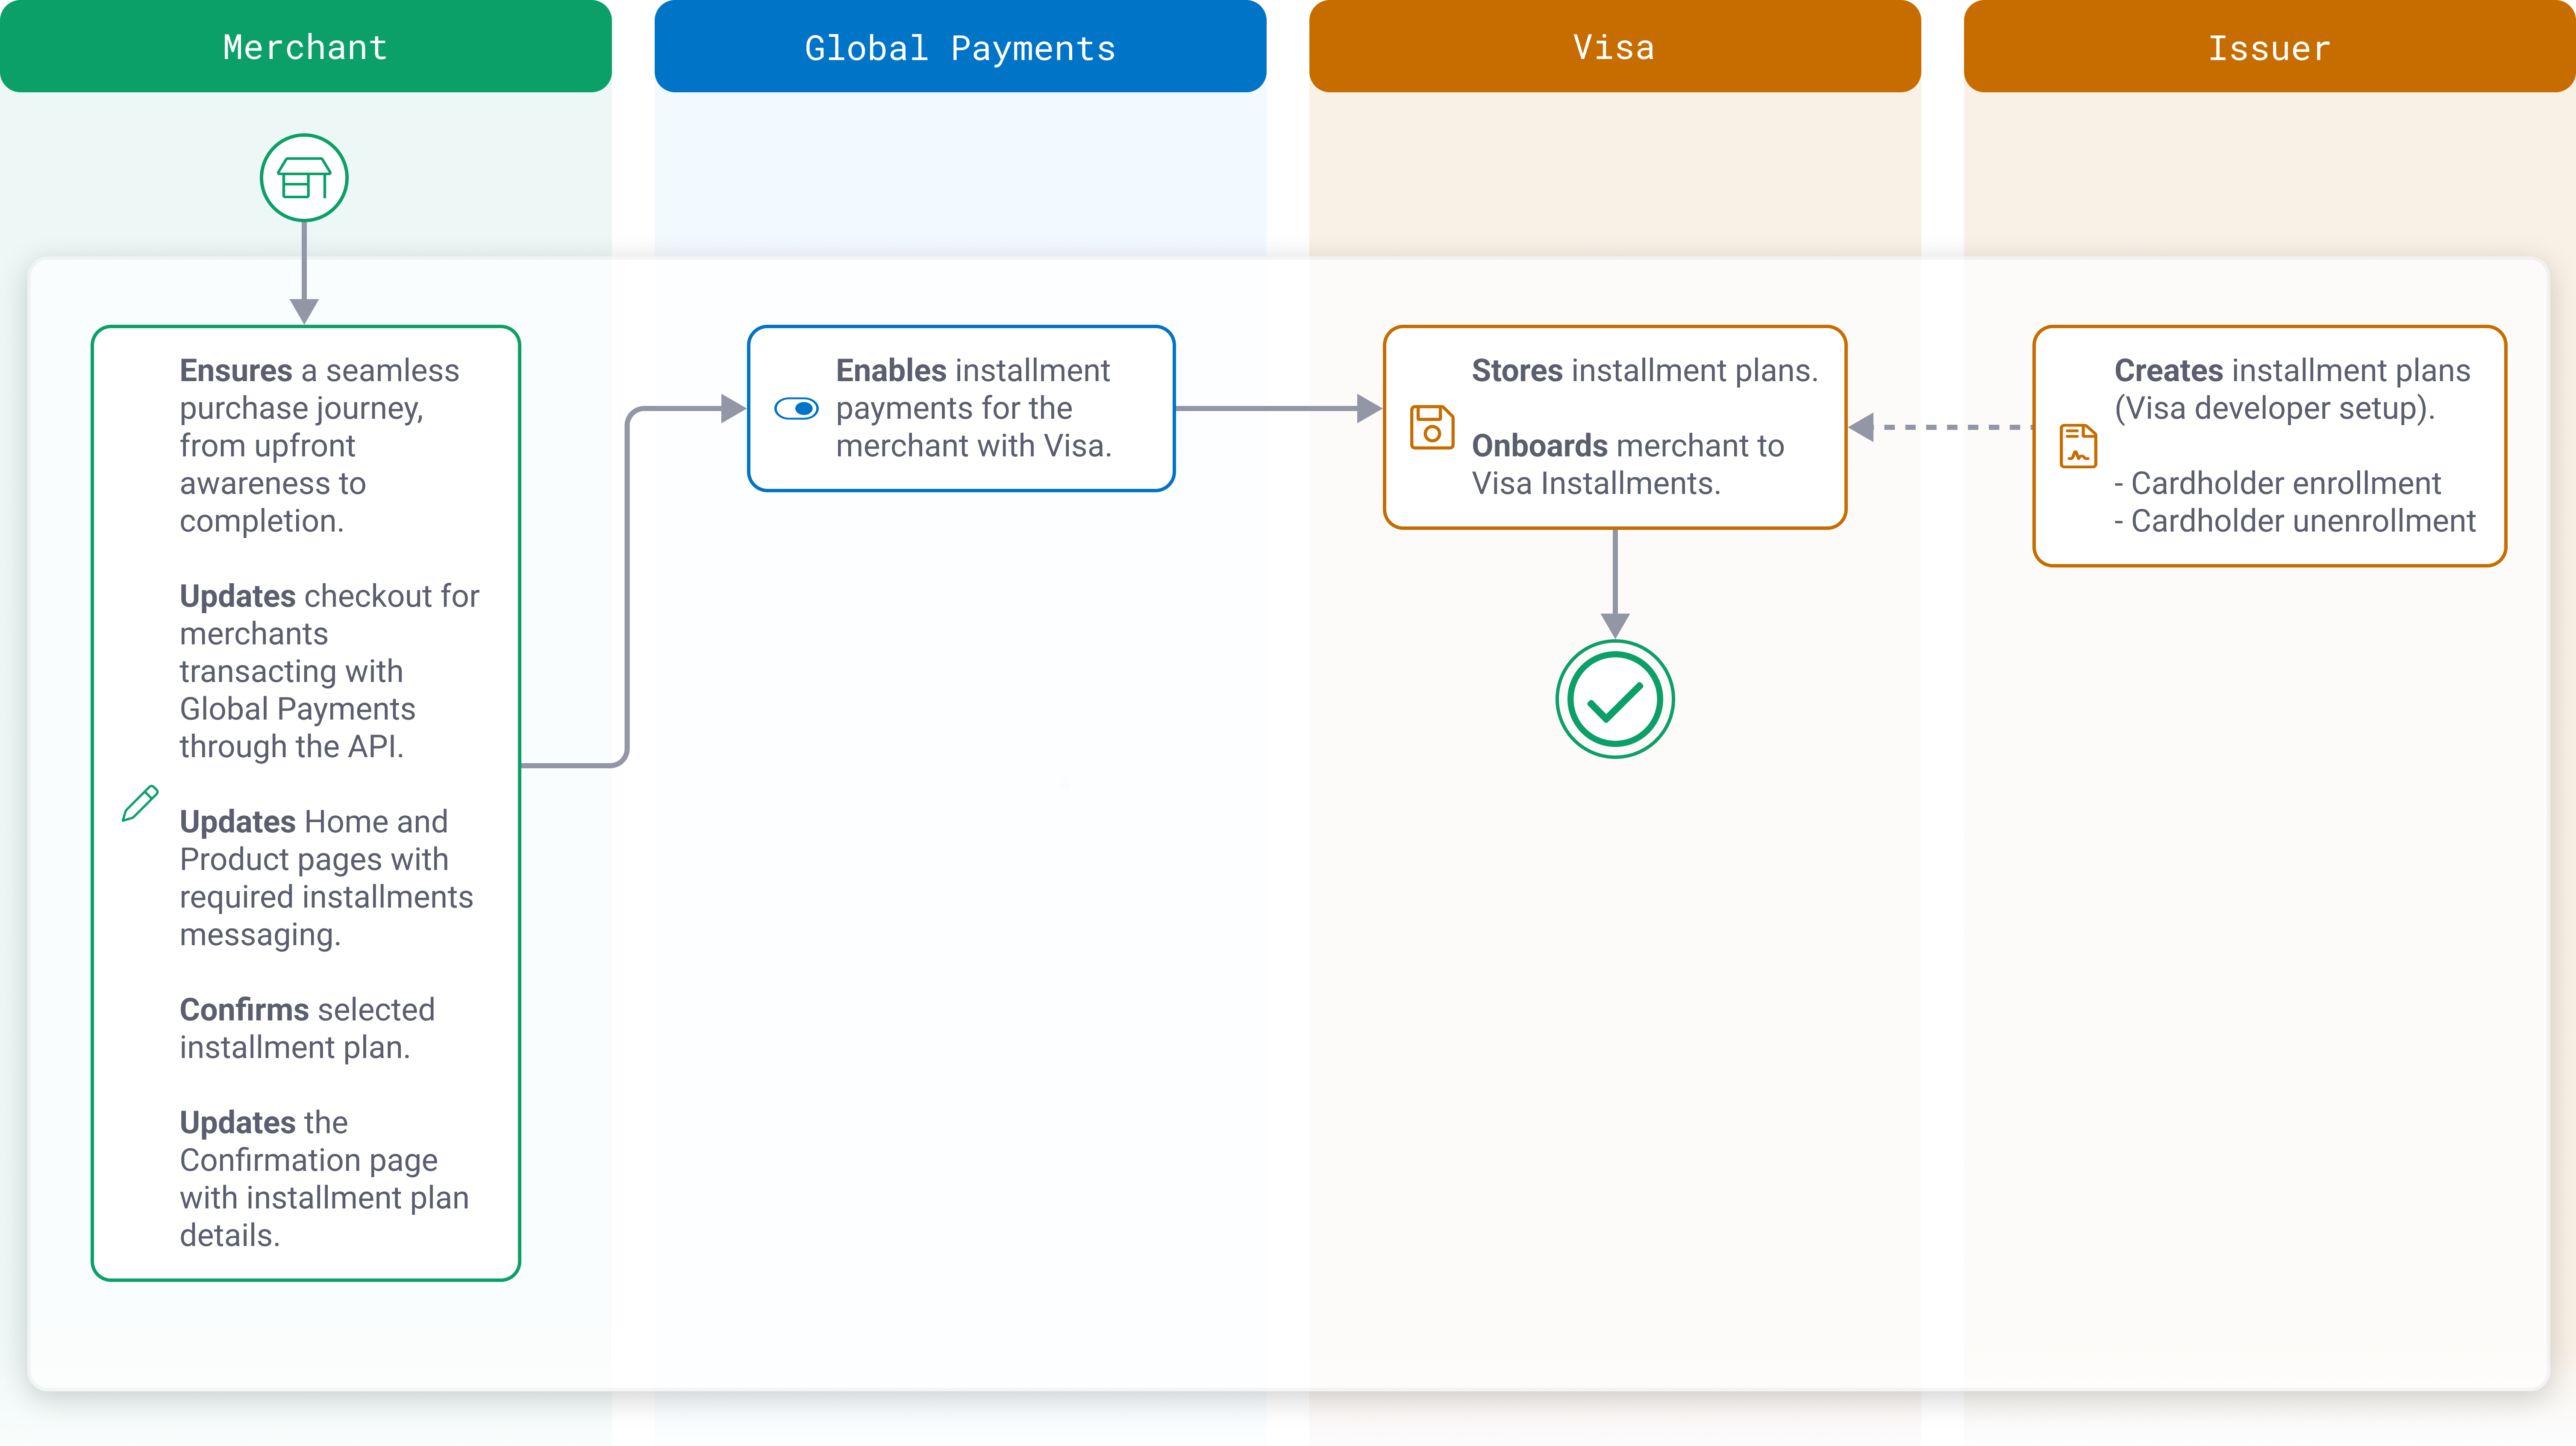
Setting up the service for direct API integration typically works like this:
Step 2: Retrieve installment plans
Installment Service endpoints:
Here, we use the GetEligiblePlans request to retrieve the eligible plans that match the Issuer’s criteria for the transaction.
For syntax tables and security hash information, see Installment Service in the API Reference.
curl https://api.sandbox.globalpay-ecommerce.com/installments/plans/match
-H "Content-type: application/json"
-H "Authorization: sha256hash ff90a189d9ba5a23eec8578ddffba350fbd701faaba7428c59b65ca2c83e1bdd"
-X POST
-d '{
  "partner": "GPECOM",
  "provider": "VIS",
  "merchant_id": "MerchantId",
  "account_id": "accountId",
  "card": {
    "number": "4263970000005262"
   },
  "amount": "1000",
  "currency": "CAD",
  "channel": "ECOM",
  "request_timestamp": "2023-01-01T12:00:00.000Z",
  "filter": {
    "enabled": true,
    "max_term_months_merchant_funded": 24,
    "plan_type": "MERCHANT_FUNDED"
    "amount_threshold": 1000
  }
}'Step 3: Confirm selected plan
To confirm the selected installment plan by the user, send the plan details in the Authorization request. After the cardholder selects an installment plan, the merchant should provide installment plan details in Auth and Receipt-in requests under the optional XML tag.
For the full Authorization request, see Authorization in the API Reference.
Installment Service Confirm selected plans endpoints:
<installment>
<provider>VIS</provider>
<planid>3fa85f64-5717-4562-b3fc-2c963f66afa6</planid>
<tcversion>2</tcversion>
<tclang>eng</tclang>
</installment>Step 4: Enrich checkout with installment details
When displaying plan details, you must comply with the messaging options in our Installments Enabled by Visa UX Guide. To download the guide, see the Display installment plan details section.
For help with implementing the Installment Service into the checkout experience for your app or website, use our Installments Enabled by Visa UX Guide. The guide focuses on information visibility in ecommerce transactions and includes design requirements and marketing guidelines to help you get started. To download the guide, see the Display installment plan details section.
Step 5: Display confirmation details and receipts
When displaying plan details, you must comply with the messaging options in our Installments Enabled by Visa UX Guide. To download the guide, see the Display installment plan details section.
Once the payment is processed with the installment plan and the payment is complete, you can then display the details on the confirmation page and receipt. For an example, see our Installments Enabled by Visa UX Guide. To download the guide, see the Display installment plan details section.
Display installment plan details
Although not required, you can display installment plan details on other pages of your website or application, such as on the homepage or various product pages. Doing so can raise awareness of these payment options during the shopping process and can lead to higher customer conversion rates.
If you decide to display plan details on other pages, you must use the messaging options we provide in our Installments Enabled by Visa UX Guide. The guide focuses on information visibility in ecommerce transactions and includes design requirements and marketing guidelines to help you get started.
To download the guide, click the button below.
Testing Installment Service
Our Installment Service solution is available for testing in our Sandbox environment for registered users of this developer portal. Use our test cards to try different scenarios for your application to handle.
For more information, see the Installments section of our Test Cards article.
Enhance your solution
Explore more functionality to enrich your application. For the detailed API specification and a full list of features, see the API Reference.